
I can’t overstate just how enormous Yellowstone National Park is, which can make planning a trip a little intimidating. Things are so spread out that the park itself has full-service gas stations and grocery stores. There’s just SO much to see at this national icon. So how did we pick?
I read American Wolf a few months before our trip (which by the way if you haven’t read, do so immediately) and have always been a huge wildlife nerd, so visiting the Lamar Valley was high on my list.
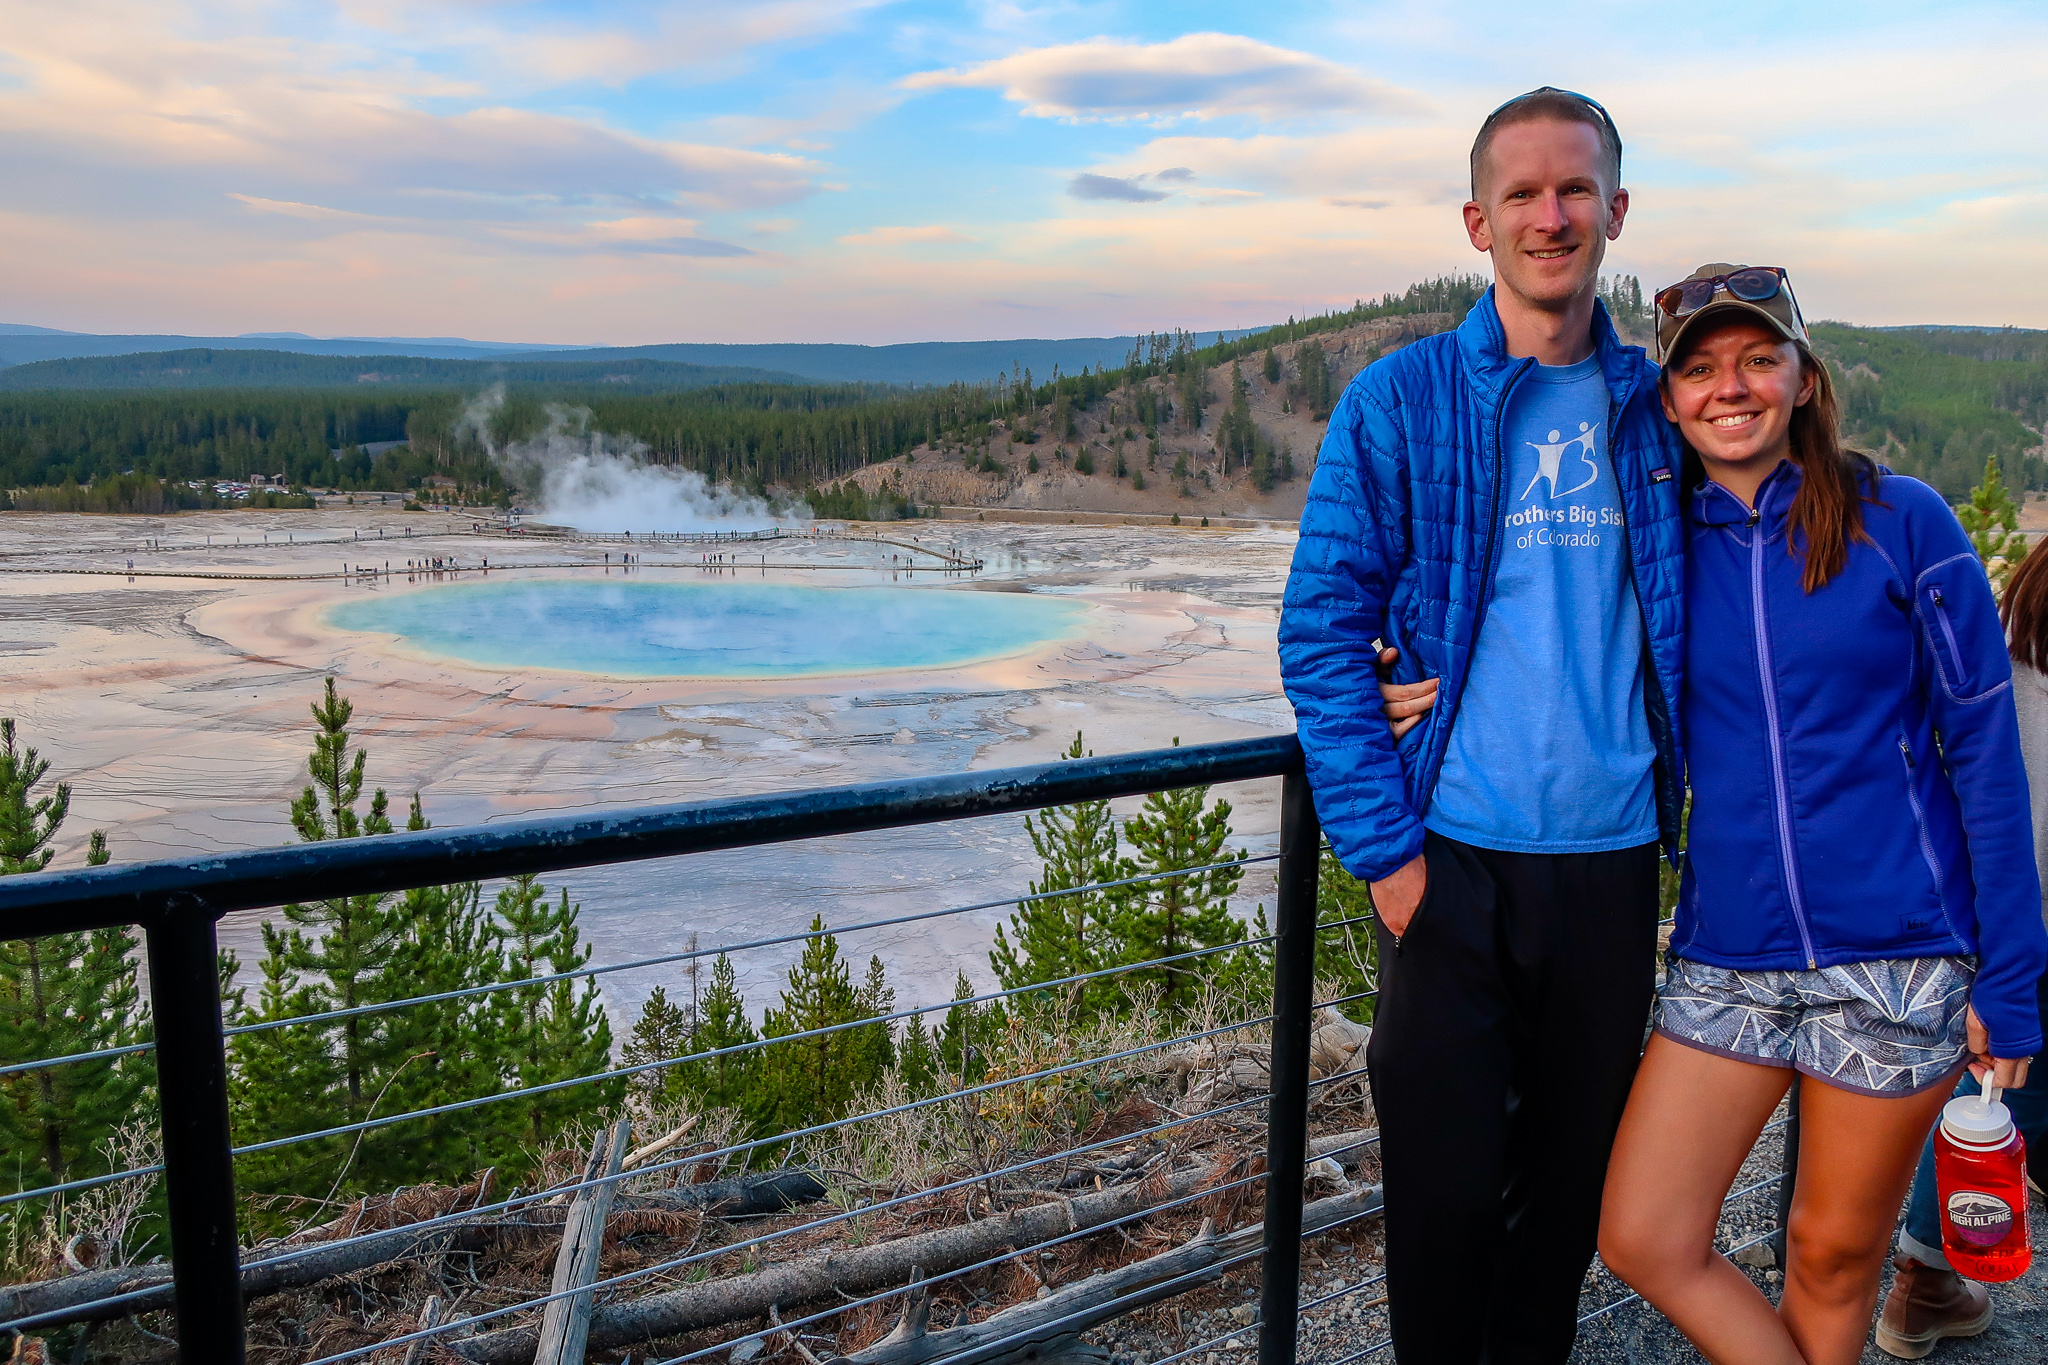
Iconic geothermal features, like Grand Prismatic and Old Faithful, were our other must-do, along with seeing the Grand Canyon of Yellowstone. We optimized our four-day road trip (followed by three days at Grand Teton) to hit what we considered the most iconic areas of Yellowstone.
The best time to visit
Early September is a fantastic time to go. We arrived September 8th, and sure, things were less green than in the summer, but there’s less rainfall than June and the leaves are starting to change colors! Most importantly, the crowds have gone down. It was still busy, but definitely more manageable than peak season. And, we had wonderfully mild fall weather during the day without it being too cold to camp (although this was admittedly a little bit of a gamble and it could’ve been much colder).
Where to stay: Camping versus park lodging
Yellowstone lodging is EXPENSIVE. We were willing to pony up, though, if it was going to be too cold to camp (for us, that’s below freezing at night). Fortunately the weather held out and the hotels all have generous cancellation policies (free cancellation up to 7 days in advance). We made reservations at a lodge and a campground for the first part of the trip, and then cancelled our lodge stays once we could see the 10-day forecast. This is a HUGE savings since rooms can run upwards of $200 per night, but does require a bit of a gamble on potentially changing weather forecasts.
The $30 per night camping rate was much easier to swallow. Plus, the Canyon Campground had so many amenities we weren’t giving up that much convenience.
We camped the first two nights at Canyon and had access to showers, laundry, flushing toilets, bathrooms with electricity, and an indoor wash station for dishes. We were a three-minute drive from a fully stocked grocery store. Keep in mind the first-come, first-serve campgrounds sprinkled throughout the park have significantly fewer amenities (which is why we were glad to be staying at Canyon).

Canyon Campground specifically is an excellent jumping off point for lots of hiking around the Grand Canyon of the Yellowstone and for a day trip to the Lamar Valley. The campground isn’t very private, but we quickly learned that none of the park campgrounds were. Read my full guide here for what it’s like to camp at Canyon.
Nearly every area of the park has a lodge, but since they’re so expensive it can be helpful to pick one to prioritize if you don’t want to camp the whole time. We chose the Old Faithful Inn because it’s a really cool historical landmark, plus we really wanted to visit the area and there were no camping options available there. We did manage to save a little bit of money on our stay at the historic inn with these tips and tricks.
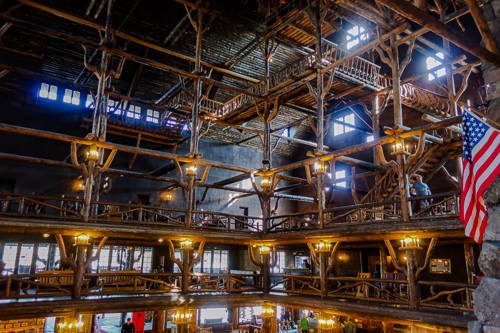
The Old Faithful area is a great stepping off point for geysers and hot springs (aka geothermal features). It also has plenty of hiking options for more traditionally mountain-ey trails (including waterfalls). We ended our trip on the southern end of the park (where Old Faithful is) since that was where we planned to exit the park to head to Grand Teton.
All your reservations (for camping and lodges) have to be made well in advance, even for the less-busy fall season. We booked all of our camping and lodging in January right when everything opened up for the calendar year, but if you don’t get on it immediately, cancellations are relatively common so you might get lucky if you check back frequently.
Our four-day itinerary
window.wanderlogEmbedKeys=window.wanderlogEmbedKeys||[];window.wanderlogEmbedKeys.push(‘stdtbvuoeq’);window.wanderlogEmbedOptions={“alwaysShowRouteLines”:true,”version”:2};!function(){var c=document.querySelectorAll(“script”),r=!1;if(c.forEach((function(c){“https://wanderlog.com/embed.js”===c.src&&(r=!0)})),!r){var t=document.createElement(“script”);t.async=!0,t.src=”https://wanderlog.com/embed.js”,document.body.appendChild(t)}}();Day 1: Grand Canyon of the Yellowstone
We arrived at the southern entrance to Yellowstone in the late morning after driving in from Riverton, Wyoming (about three hours away). We stayed in Riverton the night before so we could split the 10-hour drive from Denver into more manageable pieces. Lander is another option to do this – there’s very little difference in distance between the two towns (although Lander is prettier), we just needed a Holiday Inn so we could book with hotel points and the one in Riverton had availability.
Our final destination was our campsite in Canyon Village, but we explored the southeast corner of the park on our way there to get a glimpse of Yellowstone Lake and the Hayden Valley (you drive right by/through both of them on the way to Canyon). We set up camp and then hit the trails!
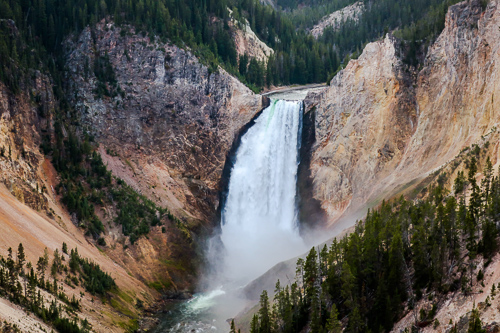
If you only have time (or desire) for one hike, I would recommend the North Rim of the Grand Canyon of the Yellowstone over the South Rim. Both are just a few minutes drive from the campground.
The South Rim is much busier thanks to Artist’s Point (more on that in a moment), but the views from the North Rim were even more stunning and really blew Artist’s Point out of the water. Hiking farther down the North Rim Trail would also give you the same canyon panoramas that our hike to Sublime Point did. However, Artist’s Point is completely paved and therefore easier to access.
South Rim – Artist’s Point (no hiking involved): Artist’s Point is one of the more famous overlooks. It’s right next to a parking lot so getting there doesn’t require any hiking. Even in the less-busy September season, we were packed in like sardines with tour buses of people. And, once we saw the view from other overlooks, we realized it wasn’t really worth fighting the crowds for a view from Artist’s Point.
South Rim – Hikes from Artist’s Point (3+ miles round trip): Our first choice was the Uncle Tom Trail, but it was closed for construction in September 2018. Instead, we hiked to Point Sublime (approximately three miles round trip) which had beautiful views of the entire canyon. Ironically, the point you end up at isn’t the most stunning view, but the views along the way are tremendous and it was a great way to stretch our legs and get our first taste of Yellowstone!
I appreciated that all the trail options were fairly flat. The Sublime Point Trail also had just enough people on it to help me feel more at ease since I was really scared about running into bears.
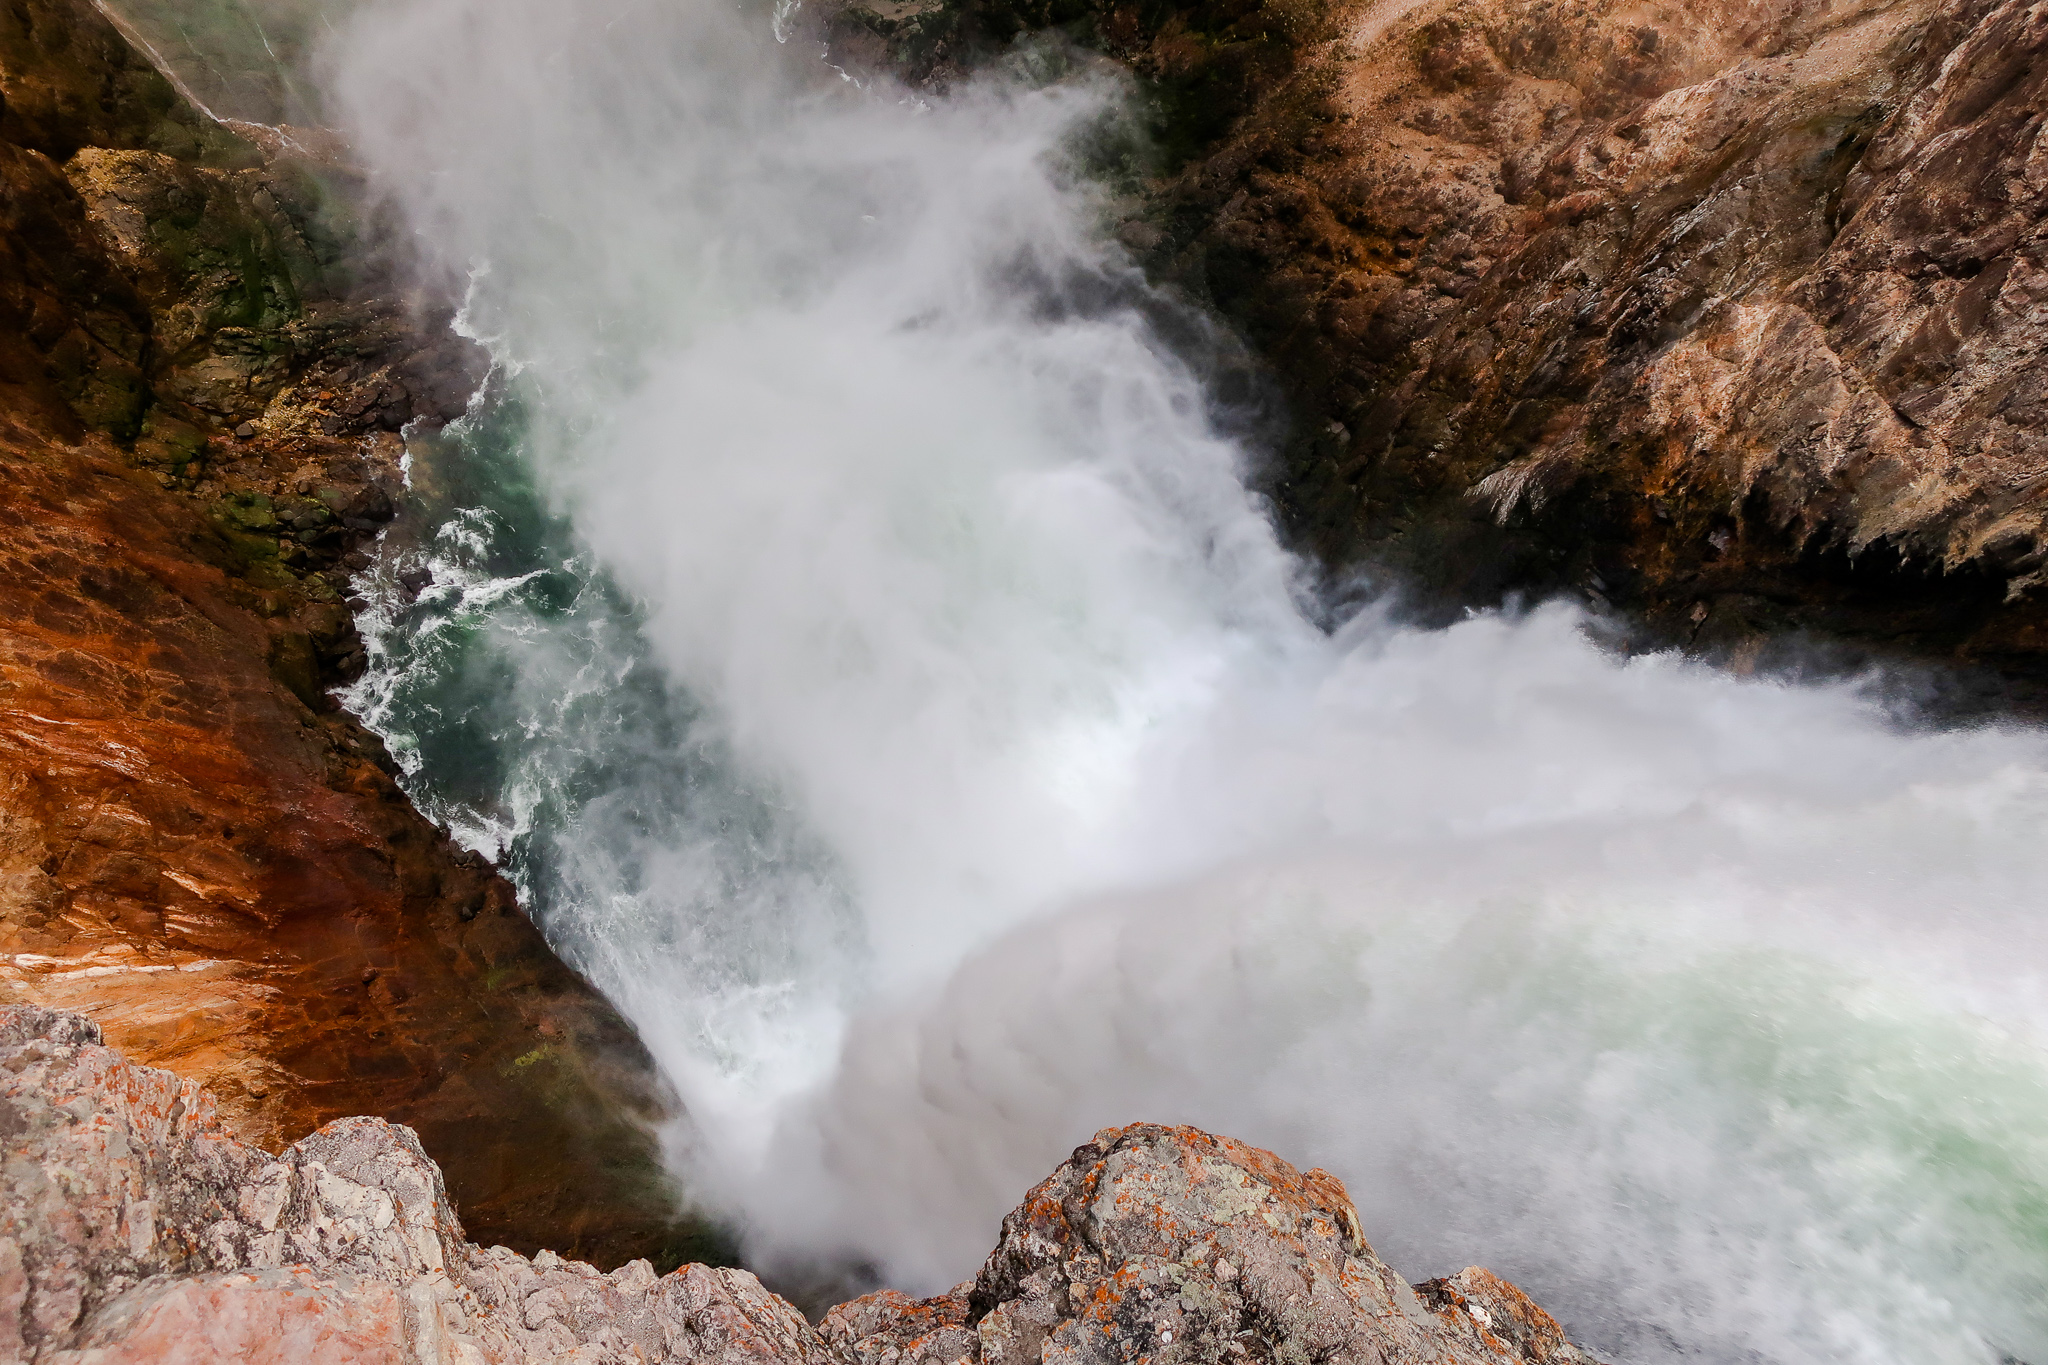
North Rim – Brink of the Upper and Lower Falls (approximately one mile total): In the early evening, we went back out to hike these two trails that, as the names imply, are at the brink of two huge waterfalls. The Lower Falls are the bigger of the two, and are the ones you would’ve seen from Artist’s Point.
The hike to the lower falls overlook (it’s literally a deck right on the brink of the waterfall) is short (half a mile total) but steep. Don’t let this stop you, though! There are plenty of places to sit and take a break and this was absolutely worth the hike back uphill. The vantage point is unmatched. I get a little bit of vertigo around steep drop-offs, but wasn’t bothered by this overlook and am SO glad I went a little out of my comfort zone to do this.
We got back in the car and continued driving down North Rim Drive to the Lookout Point overlook to get a view back at the Lower Falls; this was the perfect way to cap off the evening and get the best view yet of the falls (also why you could skip Artist’s Point if you wanted to). If it’s daytime, you can also wander down the North Rim Trail as much (or as little) as you want!
All of these hiking options are no more than 10 minutes from the Canyon Campground entrance, one of the reasons I loved staying there.
Day 2: Lamar Valley
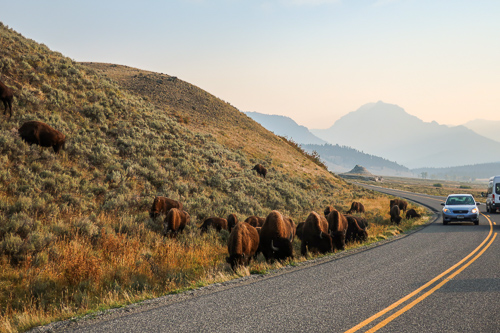
Lamar Valley wolf watching (1 hour from Canyon Campground): We woke up at 5 a.m. to make it to the Lamar Valley by sunrise. This is the best place and time to spot some wolves, which was one of my biggest priorities when planning our trip. Driving through the dark before the sun comes up is legitimately pitch black with no lights, so drive slowly and carefully!
We drove into the valley (outside of the Tower area of the park) until we saw a crowd of wildlife watchers, then pulled over and parked (in designated parking areas/shoulders, please do the same). We had regular binoculars, which ended up not doing much, so fortunately all the pros were more than happy to share their big fancy scopes, and their knowledge.

We saw an entire pack of wolves mingling with a herd of buffalo, so my day was made and the 5 a.m. wake-up call was 100% worth it! With the help of the more high-powered scopes people shared, we could see the wolves clearly enough to see the radio collars on their neck. I was so incredibly grateful for the generosity of others and really enjoyed having this quiet, shared experience with a small crowd of people, all committed enough to be there right before sunrise.
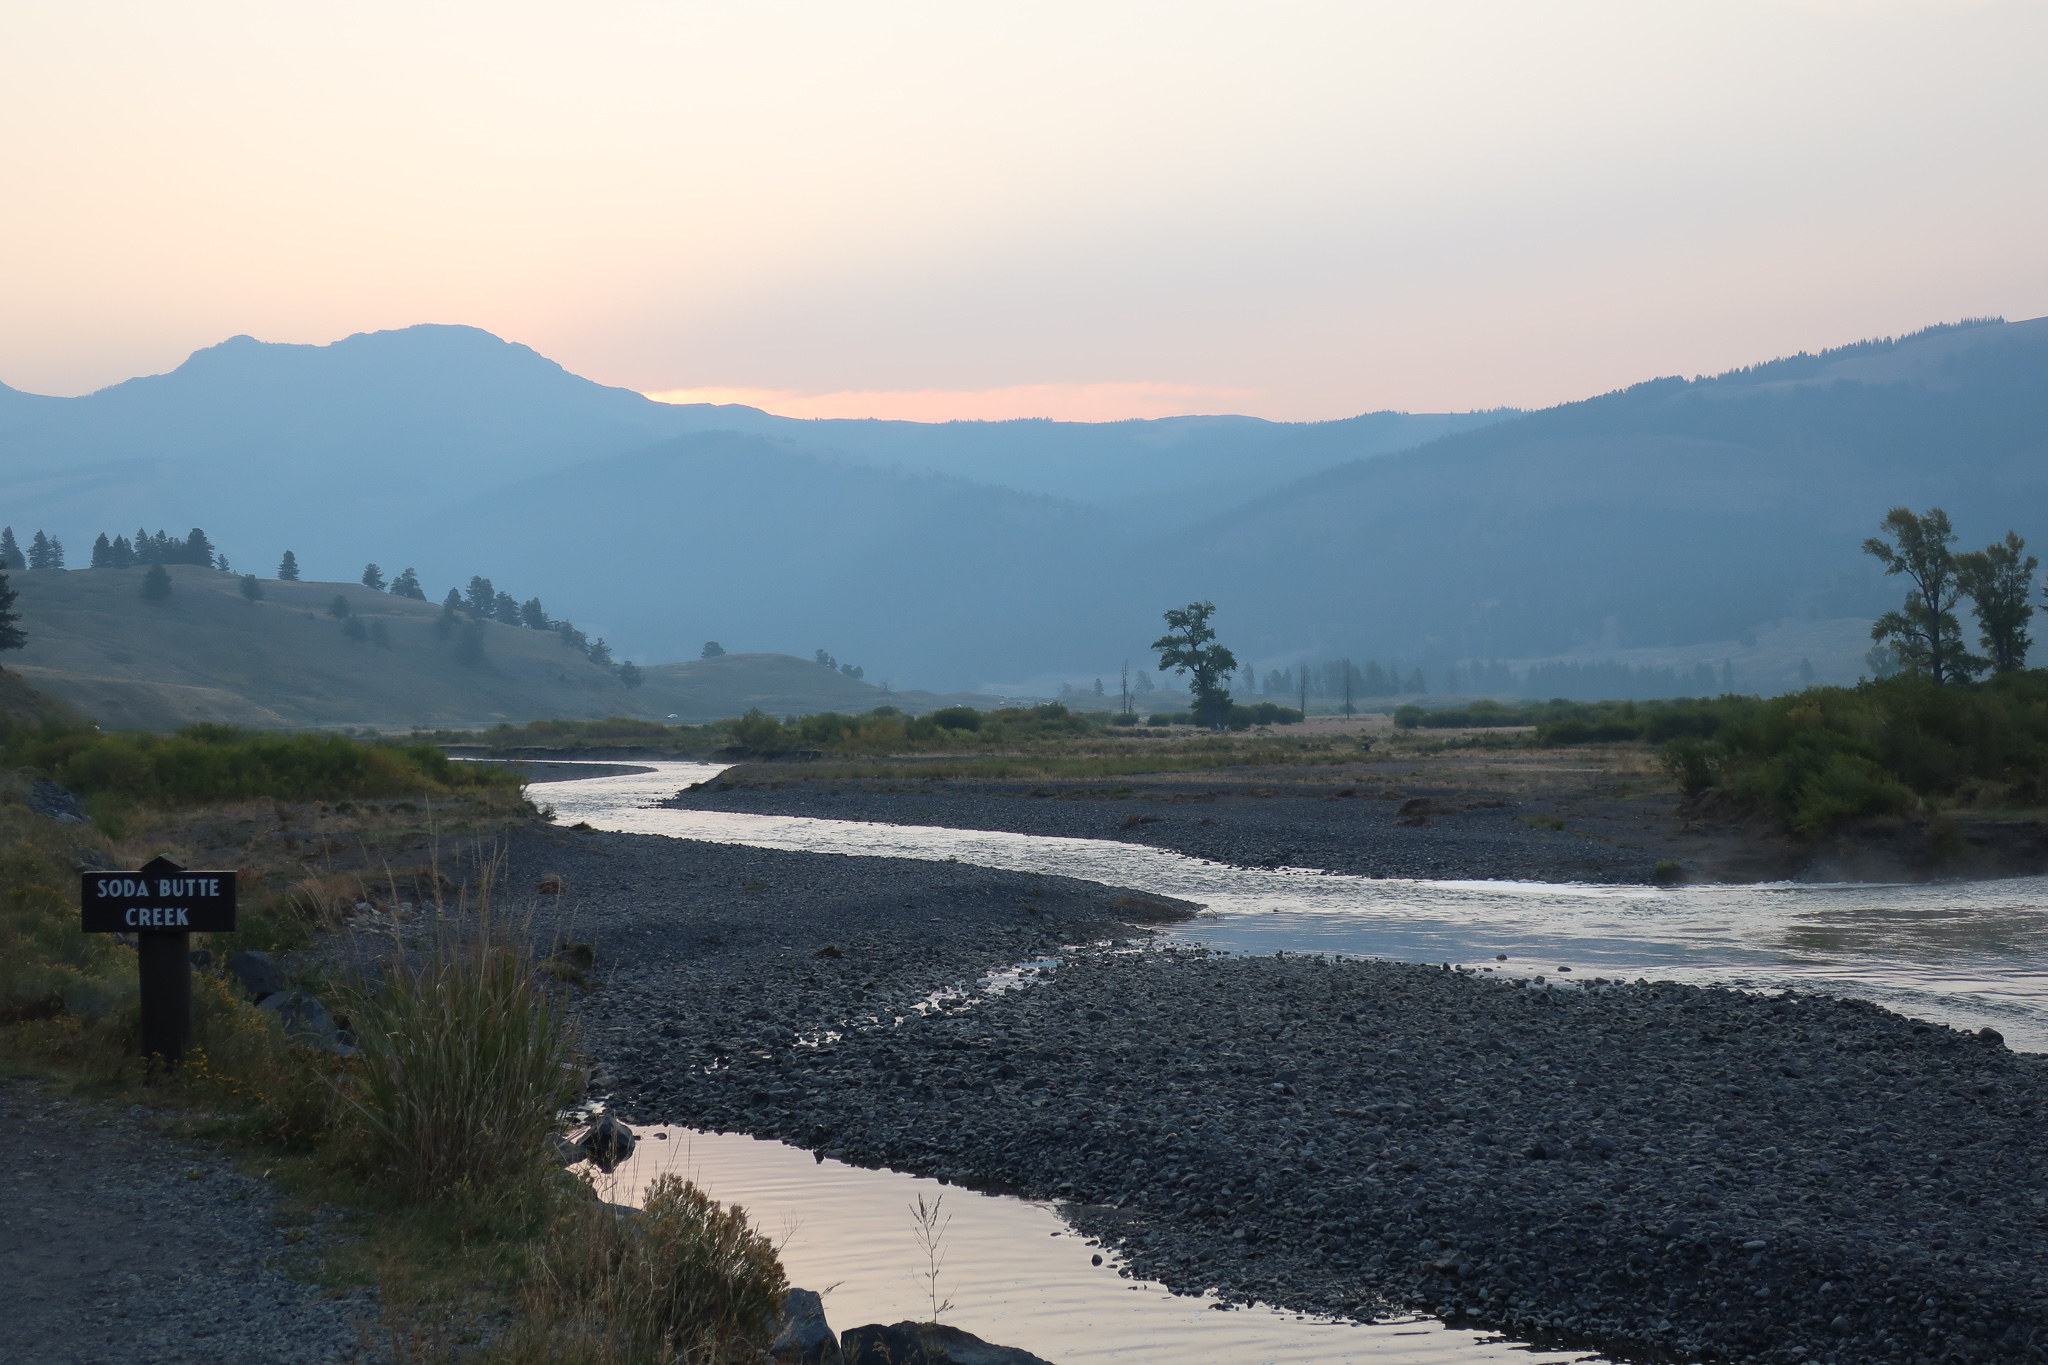
Breakfast on the road: After we got our fill of wolf watching, we drove a few more minutes north to a pull-out at Soda Butte Creek for a roadside breakfast. This camp stove was super easy to travel with and made it quick to whip up some oatmeal for a more filling breakfast before hiking.
Trout Lake Hike (1.2 miles round trip): We made an entire morning of it in the Lamar Valley area by hiking to and around Trout Lake. My complete guide to this beginner-friendly hike is here. I highly recommend it for the stunning mountain lake views!

Slough Creek Trail (pick your distance): On the way back from Trout Lake, we made a side trip to Slough Creek (30-minute drive total from Trout Lake) to do a bit more hiking and check out the campground. This is a first-come, first-serve campground that’s a bit more isolated, and we ended up being glad we had booked the more centrally-located Canyon campsite.
The trail that leaves from the campground is 14 miles total round trip, so we just enjoyed as many miles as we felt like doing before turning around. This trail was very pretty but much less heavily trafficked, which ended up making me too nervous to go more than a few miles. We didn’t see any wildlife except for some birds, though, so I’m sure I was overreacting.
Throughout our drive, we saw TONS of buffalo, most of which were just hanging out on the side of the road. Drive slowly and let the person in the passenger seat take photos so you don’t get into an accident.
Tower Falls Overlook (100 yards): At the Tower Junction on your way back, there’s a restaurant and waterfall overlook. We weren’t ready to eat yet, but made one last stop to see the waterfall, which was an easy 100-yard hike out to the overlook. It was crowded, but I thought worth the stop and a nice way to split up the trip back to the Canyon area. Don’t be expecting the powerful falls of the Grand Canyon, though, especially in September. This lives up to it’s tower name – tall and skinny!
There are a ton of other quick overlooks to stop at between Tower and Canyon, which makes the drive back overall much more enjoyable than the trip out you made in the dark. Stop at whatever sounds interesting!
After napping off your morning at the campground, you could easily fit in more activities if you wanted to. We decided to hit the showers, at which point I unfortunately was fully hit with the altitude sickness I’d been struggling with all day and almost fainted. So the rest of our day was napping and spending time around the campfire, which was still very pleasant! 🙂
Day 3: Old Faithful
I was still feeling pretty crappy by morning, which only illustrates how important it is to stay hydrated and not underestimate the altitude of the park. I’m from Denver, after all, and still got altitude sickness! I chalked this up to spending the week prior at sea level, getting on a plane, then driving straight to Yellowstone, all while not drinking enough water. Stay hydrated and rest as much as you need so that you don’t suffer a similar fate.
Fortunately, Old Faithful is at lower elevation than the Grand Canyon area. We packed up camp and headed to the southwest corner of the park to check into the Old Faithful Inn (and visit urgent care). Don’t forget my tips for making your stay at the inn more affordable >>
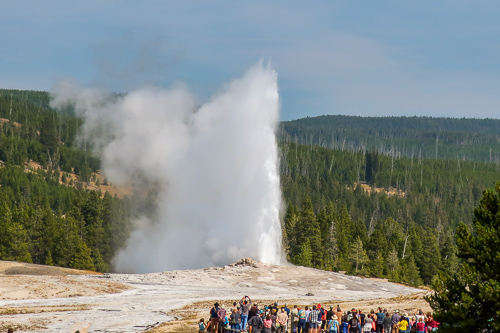
Watch Old Faithful erupt: Fortified with some anti-nausea medicine from urgent care (there is practically a small city surrounding Old Faithful), we got ice cream at the inn and staked out a spot on the deck to watch Old Faithful erupt. The deck was way better than walking up to the actual geyser (we did both just to make sure) since you don’t have to fight the crowds as much. You can also hike up to an overlook above the geyser, which was recommended to us by friends, but unfortunately wasn’t going to work for me that day.
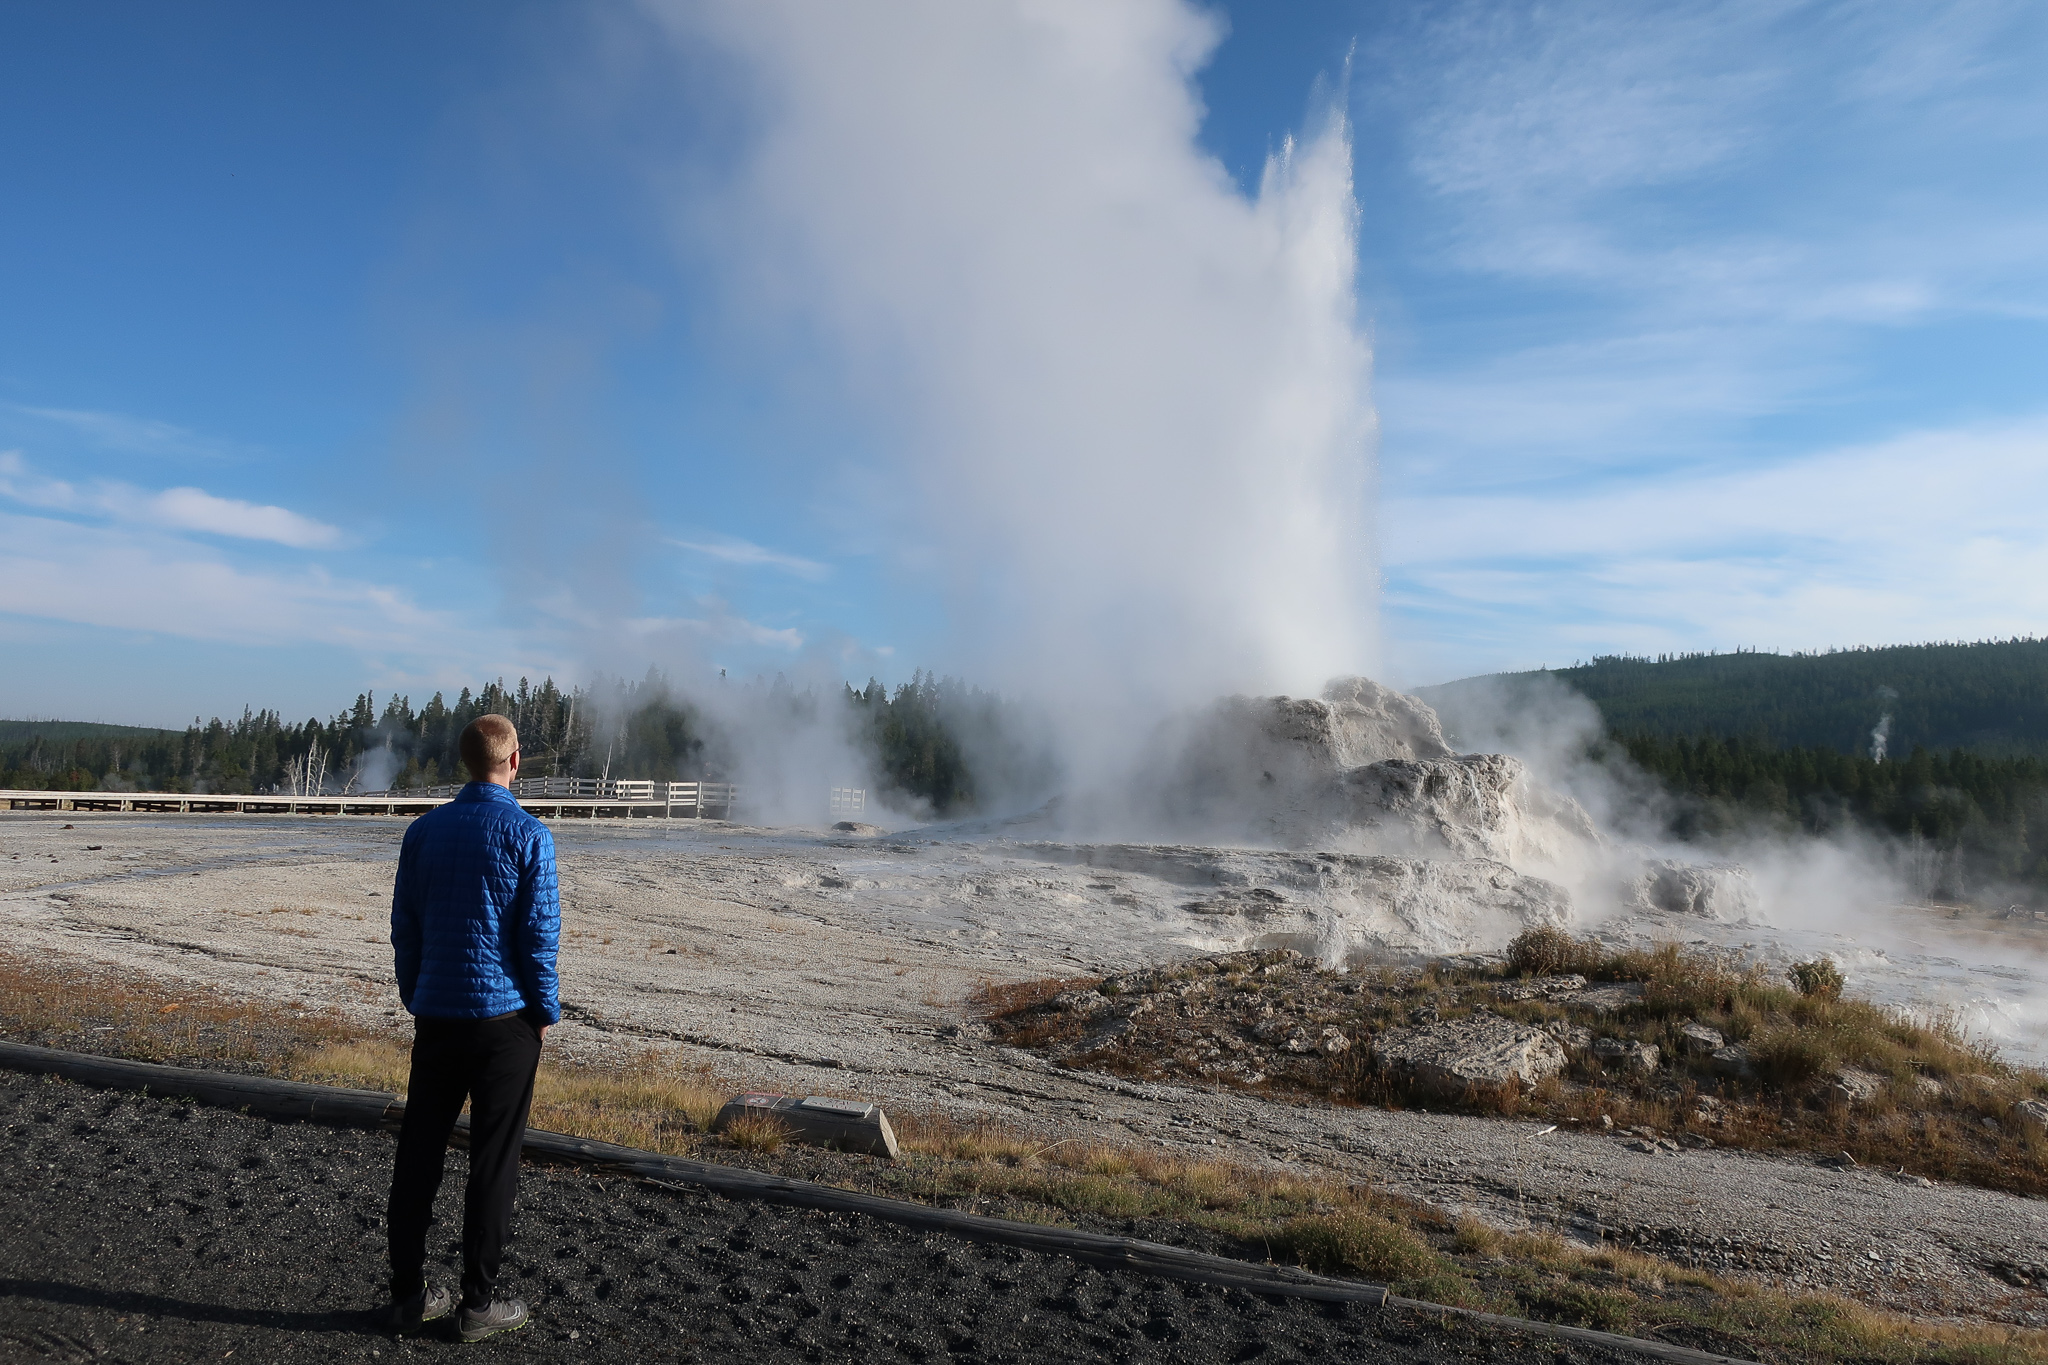
Explore Upper Geyser Basin (3 – 4.5 miles round trip): The other geothermal features surrounding Old Faithful were honestly more interesting than Old Faithful. Even though the other geysers were less predictable, we still saw multiple eruptions. You can get really close to Castle Geyser, which turned out to be our favorite, but we also got really lucky with the timing of the eruptions. That can be hit or miss if you’re only there for a day or two.
The entire walk is pretty level and part of a boardwalk, making it very beginner-friendly. Even with altitude sickness, I was able to do the entire 3.5-mile loop. You can add on the Old Faithful Overlook to make it 4.5 miles or make it shorter by turning around whenever you want instead of doing the entire loop.
Wildlife watching and cocktail hour: We had a bunch of time to kill before our late-night dinner reservation, and this was a great way to do it. We took a short walk down to Castle Geyser around sunset and saw an entire family of elk! I was surprised by how many times I could walk around the boardwalk and not get tired of it.
Afterward, head up to the second floor of the lodge and jot down any wildlife you spotted on the whiteboard (and enjoy seeing what others have noted)! If you’re in the mood, grab a cocktail from the bar while you’re up there (we loved the Huckleberry Mule) and settle into a cozy leather chair and listen to the incredible live music. We were treated to piano the first night and a cellist the second. It was heavenly!
Dinner at the Old Faithful Inn: You have to make advance reservations to eat in the historic dining room. We did this pretty late in the game (a few weeks prior) so we had to eat dinner at like 9 p.m. The food was expensive and not bad, but I would keep your expectations tempered. We really enjoyed the experience of the historic dining room, but weren’t wow-ed by the food. It was better than the cafeteria options at the other surrounding lodges, though.
Day 4: Old Faithful’s Surrounding Areas
Breakfast at the Old Faithful Basin Store (aka Hamilton’s Store): Next door to the lodge is a more affordable and faster breakfast option than the buffet at the inn. Since we already got our historic dining experience in the night before, we opted to get breakfast here. It was still expensive, but the food was significantly better than the Old Faithful Inn Dining Room. Definitely stop in for breakfast or lunch!
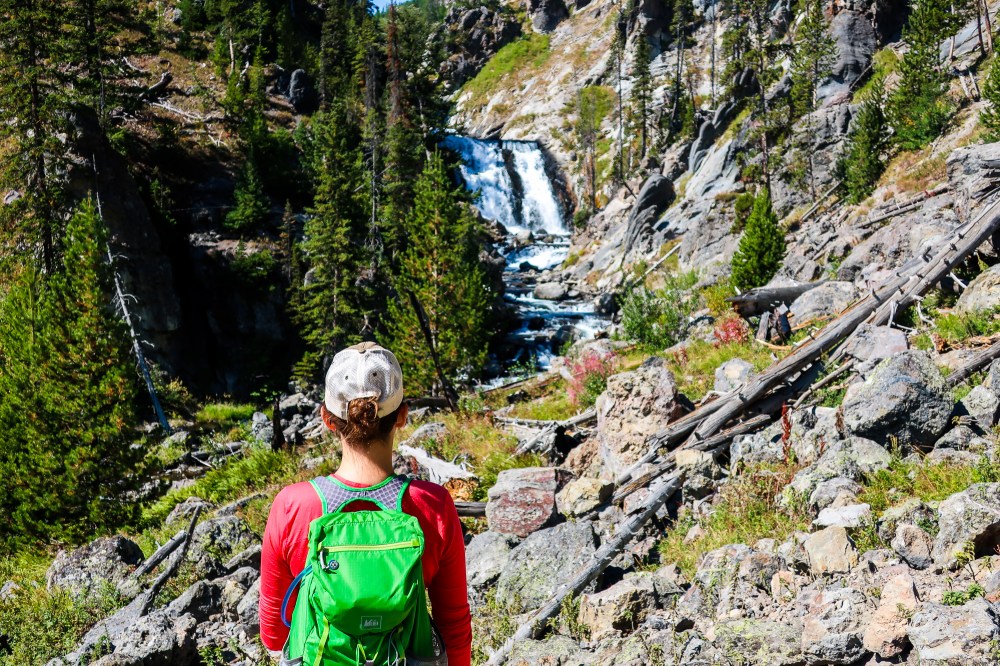
Hike to Mystic Falls (2.5 mile round trip hike after 8-minute drive from Old Faithful): This beginner-friendly waterfall hike leaves from the Biscuit Basin area, just down the road from Old Faithful. Make sure to take a lap around all of the geothermal features before or after your hike to Mystic Falls. At this point, my bear anxiety was finally easing up so I was comfortable with the fact that we only saw a few people along the hike. The bottom of the waterfall is a great place for a picnic lunch, too! Read my full trail guide here >>
We originally wanted to do a longer hike to Fairy Falls (5-6+ miles), which I would still recommend if you have the appetite for something that long and aren’t recovering from altitude sickness. It looked beautiful in the guide book and was highly recommended by multiple friends!
Sunset at Grand Prismatic (approximately 2 mile round trip hike after a 15-minute drive from Old Faithful): This was another can’t-miss Yellowstone icon that was even more stunning at dusk! We hiked to the overlook and did the boardwalk that goes right up to Grand Prismatic, and I would recommend both. The overlook is uphill on the way out, but short and beginner-friendly (less than two miles total round trip). Adding on the board walk should put you at right about two miles total for hiking around.
Dinner at the Bear Pit Lounge: A smaller dinner menu, but easier option than the dining room back at the Old Faithful Inn. Make sure to get a huckleberry-themed cocktail (or lemonade or dessert) to cap off your trip – huckleberry everything is a Yellowstone hallmark!
What I would do differently
Not get altitude sickness! Or at least done a better job of avoiding it by hydrating better.
I also would’ve worked on my bear anxiety much earlier on. We were on plenty of hikes that were screaming “bear country” (we were out in early morning, by ourselves/on less populated trails that were lined with berry bushes) but we still never saw a bear on a hike.
The only time we even saw a bear was on the side of the road headed to Grand Teton! My anxiety about bears interfered with our first few days of hiking, and I wish I could’ve been a bit more relaxed about things. Bring bear spray and be prepared, but try to leave your anxiety at home.
There are endless hiking options to choose from, and I thought we did a good job of picking the ones that helped us see what we came for. If you want to do more research on your own, this guidebook was really helpful in evaluating all of our options.
If you want to spend more time on the water, you could adjust your stay to include the Yellowstone Lake area. There is another really incredible historic lodge there – we took a quick peek on our way to Canyon but didn’t stay long. Had it been later in the day, getting a cocktail to enjoy in the huge sitting room overlooking the lake could’ve been fun. It also struck me as a romantic place to spend an anniversary. You would need either more time than just four days or you’d have to cut out Old Faithful or the Grand Canyon – neither of those were an option for us.
Overall, keep in mind that in four days you have to pick and choose where you want to go – you can’t see all of Yellowstone without more time. But our four-day trip focusing on the Canyon, Lamar Valley, and Old Faithful areas of the park was everything we were looking for. Bookend your trip with an additional three days in Grand Teton National Park. Here’s our itinerary >>

Wonderful blog with so much pertinent information about the park. Thanks so much for this info and the lovely pictures. It will be sure to help when we go to visit.
LikeLike
Thanks so much, Geri! Glad you found it helpful.
LikeLiked by 1 person