Beginner’s Gear Guide: Best Cooler for under $100

Coolers are a staple for any camping, road tripping, or day-drinking household. And while you can drop hundreds of dollars on a Yeti (and then constantly tell people it’s SO WORTH all that money), you could also just spend about $60 and get this one.

We have put AO Coolers’ canvas cooler (36-pack size) to the test on our week-long road trip around Colorado, on a ladies’ camping trip, and on Labor Day Weekend to transport a small cache of booze. It keeps everything super cold (and can handle 20 pounds of ice), is easy to pack because of its soft sides, and you get a ton of room for the price.

On the road trip, we had to rely on the cooler to keep our food cold enough to not give us food poisoning…in insanely hot daytime weather…for multiple days. Even when the ice was more liquid than solid, it stayed so cold it was legitimately painful to grab things out of the cooler. We stored meat, dairy, and even just things we wanted to keep from melting (see: smores chocolate) and never ran out of room or confidence that we weren’t going to contract a food-borne disease.

img_1118
You can even store this cooler sideways and it doesn’t leak! Really handy if you are not good at adulting.

The soft sides are what really makes this cooler truly awesome. You can shove it anywhere, and don’t have to block off an entire section of your trunk that’s the ONLY place for the cooler. The canvas is flexible enough to fit anywhere, but you don’t have to worry about anything getting crushed either.

The shoulder strap could use a little bit of padding. It’s a little uncomfortable when you’ve got the cooler packed, particularly with the 20 pounds of ice that it fits. That being said, the shoulder strap is great for carrying, especially for camping since those coolers with wheels aren’t built for off-roading.

img_1257
Apparently, this was the only photo I took of the cooler’s capacity, which actually just makes it look like we subsisted off pre-made iced coffee, chocolate, and Bud Light lime. We kind of did though.

Also, if you’re the type of person that say, leaves the cooler on your deck to dry out and then forgets about it for a week and there’s a bunch of pine needles and other weird tree stuff in it, it can be a little inconvenient to clean since the top opening is a little more narrow than the bottom.

Overall, I can’t recommend this cooler enough. It’s the perfect road trip cooler since it keeps things COLD for days at a time, and is also great for everyday use since it has a huge capacity. It works, it looks good, and doesn’t break the bank. What more could you want? Quick shipping because you’re a procrastinator or insanely impatient (or both, like me)? Get it here on the ‘zon, it’s eligible for Prime shipping.

Note: While it would be totally awesome to receive things for free to review, that is not the case here. My internet researching-loving husband found this recommended on a few other websites and we needed something for our road trip.

This post does include affiliate links, but I would not hawk a product I wasn’t 100% behind. This is an awesome cooler, I didn’t get anything in return for this post, and I hope this review is helpful for you to find the best cooler for you!

What I learned on a weeklong road trip around Colorado

Billy and I set out for a seven-day road trip in June 2016. We were originally going to venture into eastern Utah, but once the forecast started at 102 and continued to climb to 111 degrees, we opted out and headed up into the mountains instead.

I learned a lot about myself in seven (well, actually we only made it six) days in the car with a heavy dose of camping. Mostly, that I cannot hang and am incapable of camping two nights in a row, even with an air mattress and bathrooms with running water.

Here’s what else I learned.

Being in the desert (ie far from water) doesn’t mean bug-free.

Actually, quite the opposite. I learned this the hard way at Colorado National Monument. We were completely swarmed at dusk while we tried to “enjoy” dinner. The next morning, we started hiking shortly after sunrise, but by 9 am the bugs were out in full force again.

And, early summer doesn’t mean it won’t be incredibly hot.

Considering there was still several feet of snow in the mountains in May, I assumed that meant June would be relatively mild at lower elevation. That might be true in Denver (less and less each year, thanks global warming), but in the desert? Not so much. We were MELTING in Grand Junction, and canceled our original plans to go to Moab because the highs were over 110.

On later road trips, I learned that the time to visit the desert of western Colorado or Moab is in the spring or fall.

Camping is really hard.

Almost every night we camped, I woke up cold but also very damp. And by “wake up,” I mean “I woke up every few hours all night every night we camped.” We bailed (twice) on a second night of camping. The first time, we unashamedly left the campsite at 9 p.m. and just kept driving until the next town. The Dolores Mountain Inn was fantastic, if you ever find yourself in a similar spot in Telluride.

I realized that I just don’t sleep well camping, so I can’t do it multiple nights in a row without getting really grumpy. I’ve since made it two nights camping when we’re heading home on day three and I get to get back in my bed. Otherwise, it’s not gonna happen for me.

The only exception is renting a big ol’ camper van. We found one on Outdoorsy with a queen bed and slept like babies for multiple nights in a row.

I thought Mesa Verda National Park was kind overrated.

I think I over-estimated how interested in cliff dwellings I am. Also, the drive just to get to any archaeological site is at least an hour. I got so antsy on the drive back out of the park that I almost got a speeding ticket. The park ranger told me that he didn’t want me to be sorry, he wanted me to drive slower. And I almost sunk into the seat with shame/embarrassment. Way to cut to my core, park ranger.

A good cooler is a lifesaver on a road trip.

I rarely say this, but buy one now and don’t ever look back. Here’s my favorite. (Spoiler: it’s NOT a Yeti!)

I recommend a soft-sided cooler because it was much, much easier to pack around in the car. A good cooler will keep your food and drinks nice and cold, even if it’s really hot out. If you have lunchmeat or hot dogs packed for camping/road trip food, it’s especially important not to skimp. Keeping water and alcoholic beverages cold is a nice perk, too.

If you’re in a small town and your options are limited, look for the closest park.

In 2016, there wasn’t much in the way of lunch in Palisade. Instead of paying for overpriced, mediocre food, we saved our takeout budget for another day and drove to this park to grill up some hot dogs. We had a party for two in the giant “large group” pavilion since we were the only ones there! We saved a bunch of money on food for the day, plus got to relax in the shade and get out of the car.

The Million Dollar Highway is not nearly as dangerous as the Internet would lead you to believe.

I’ve driven it twice now (once by myself, once with Billy driving) and it’s nowhere near as death-defying as the Interwebs made me think. If you get carsick easily, it could be challenging at the beginning or end since those are the curviest parts.

However, I do recommend driving it south (from Durango) to north (to Ouray) so that you’re on the inside part of the highway, not on the edge. That’s a little more hair-raising since there are no guardrails (to encourage safer driving and so snow plows can get through).

When you’re almost to Ouray and you see a pull-out by a small waterfall on the side of the road, stop and look under the highway because there’s another ENORMOUS AMAZING waterfall that you can’t see from the road.

Body wipes and dry shampoo are surprisingly effective at making you a clean human.

If you’re doing a lot of camping, one XL Wilderness Wipe does a shockingly good job at making you feel like you just showered. If you have long hair, I also recommend bringing along a travel-size dry shampoo to keep the grease at bay.

Check local event calendars when you’re planning.

We made a last minute detour to Telluride (because Utah was an inferno) ad accidentally show up in during the Bluegrass Festival, which is arguably one of the biggest events of the year. I assume the festival will be back once the pandemic is under control (we went in 2016).

I don’t recommend showing up during the festival unless you plan on attending it too. Otherwise, you’re in for a lot of crowds. And a lot of unsolicited white guys playing guitar (ie: randos just attending the festival) while you try to eat lunch and tune out their drunken, off-key singing.

Packing and unpacking the car gets old. Unless you have a system.

We got so wildly disorganized that we were just throwing stuff in and out of the car at each stop. We couldn’t keep track of anything. Unpacking at the house was a total nightmare. I sweared never again!

When we hit the road in 2018 for our anniversary trip to Grand Teton and Yellowstone, we had a system. It changed EVERYTHING. Packing and unpacking every other day was no longer stressful because everything had it’s place. It made unpacking at the end of the trip much less annoying (it’ll always be annoying because you’ll be tired). It requires a little more effort day-to-day, but ultimately saves you lots of time and energy.

If splurging on a camera that’s not your phone is an option, do it.

I got a lot of really great panoramas on my phone, don’t get me wrong:

IMG_1579

In all seriousness, we got a digital camera as a wedding gift in 2017. This totally changed the quailty of our road trip pictures. This is definitely a luxury, not a must-have, but if it’s doable for you…do it! We’ve been able to print and display really high-quality pictures to help us remember our trips. You just can’t do that with a phone. Well, increasingly, you can, but I never have the most recent model of phone.

Don’t feel discouraged if you end the road trip with only more ideas for places to go.

Our first road trip took us to tons of new places in Colorado…and only inspired us to go to more places. That keeps happening on each road trip, and even though we sometimes feel bummed we couldn’t fit it ALL in, road trips are great inspiration for future ideas. There are endless options in the United States, so just keep planning!

Campground Guide: Saddlehorn at Colorado National Monument

Saddlehorn helped us kick off our 2016 road trip around Colorado, and while the campground left a little to be desired (not a lot of privacy), the access to some of the most stunning scenery Colorado has to offer more than makes up for it (flushing toilets and running water didn’t hurt either). Fruita, the closest town, is one of my favorite places in all of Colorado, largely because you’re so close to the hidden gem that is Colorado National Monument.

Directions

The Monument is super easy to get to from 70. If you drive nonstop from Denver, it’s about four hours to actually get to the campground. We stopped in Glenwood Springs for lunch, Palisade for some touristy things, and then Grand Junction for supplies at Walmart and the day was still very manageable.

Screen Shot 2016-07-12 at 9.27.10 PM

Campsites

There’s not a whole lot of privacy on the B loop, where we camped. We were basically right on top of the other tents, and the scrubby brush doesn’t provide much in the way of cover. If you stay on the far side of either loop, closest to the bathroom, you at least get some really good views in the morning.

If you’re there in the summer it’s very similar to camping on the surface of the sun. We arrived around 7 and by the time we actually got to setting up the campsite (after two trips to Fruita) it was 8 and we were STILL super hot. Our biggest takeaway from this trip was that western Colorado is a great place to go in any season except summer. Spring and fall are your best bets.

Camping at Colorado National Monument Saddlehorn Campground 3
Note the other tent directly behind Billy at the grill, and the picnic table directly behind our tent.

There are no tent pads and a not-insignificant amount of thorny things that lodge themselves in your tent, clothing, or bare skin. Ah, the desert.

Most importantly, you cannot use firewood in the Monument. The park ranger at the entrance casually mentioned that to us, and after looking at each other with a distinct “Well, F***” expression, we resigned to setting up our campsite before heading back to civilization (aka Fruita) to get charcoal. On a related note, Fruita is only about 25 minutes from the campsite and is a lifesaver if you forget charcoal. And batteries. And ice. And maybe have to make three separate trips as you realize you forgot each of these things throughout the evening.

Camping at Colorado National Monument Saddlehorn Campground 2
Not quite the quintessential camping experience

The nights are fairly warm, which is actually kind of nice since I’m used to bundling up at night for camping. It was not too hot, not too cold, and all you need is a light jacket.

Campground Fees and Reservations

Since Saddlehorn is located at a national monument, you have to pay to get into the park and to camp. Since we were planning on going to multiple national parks/monuments for this trip, we opted for the annual pass. Otherwise, entrance to the park is $25 per car and the campsite reservation is $22.

We reserved ours here, but we got there late on a Friday night and there were plenty of first-come, first serve sites still available.

Toilet Situation

Off. The. Chain. That’s still a thing the youths say right? Regardless, this is one of the major redeeming qualities of Saddlehorn. Flushing toilets, running water, AND electricity all greet you at the (very clean) bathrooms.

Nearby Activities

Saddlehorn’s other saving grace? You’re a stone’s throw from the trails and the visitor’s center. This is especially important in the summer, since as I may have mentioned, it’s hot as hell and you will want to start hiking early. We rolled out of bed around sunrise, were on the trail by 6:30, and were taking Instagram-worthy photos by 6:40. The Monument has super beginner-friendly hiking, jaw-dropping views, and a fantastic visitors center. Read my beginner’s guide to hiking the Monument here.

Camping at Colorado National Monument Saddlehorn Campground 1
Ready to rock at 6:30…we know how to vacation

Other Intangibles

For some reason, I thought that being in the desert would mean no bugs. Instead, we were under siege by mosquitos immediately upon arriving. By 7:30 a.m., they were out in full force again. Another reason to make this campground just a stopover on your way to other sights and scenery!

If you forget anything, fortunately Fruita is only about 25 minutes from the campground. We made a trip for charcoal…and then a trip for batteries, so I can assure you it’s not a long drive. Plus, it worked out since the later we set up camp, the fewer bugs and the less oppressive the heat was.

If you want to get dinner in Fruita, make a stop at Hot Tomato for pizza. Copper Club Brewery also has great beer, and if you’re there in the morning, get breakfast at the Tacorado or at Best Slope Coffee (regardless, get coffee and hang out at Best Slope).

Overall Impression

In case I haven’t made it clear by now, I highly recommend getting to the campground late, leaving early, and in general just using it as a base camp to get an early jump on hiking. If you go in spring or fall, that’s the ideal time to be in the Grand Junction area. The bugs and weather are much more manageable. Make sure this is an early stop in your summer road trip, or simply go earlier in the year!

Campground Recon does great video tours of campgrounds across the country. You can watch their tour of Saddlehorn here on their YouTube channel.


Remember everything you need with the help of my simple, clickable packing list! It’s just $5 and includes dinner ideas.


Beginner’s guide to packing for a week-long road trip

#vanlife is so hot right now, but the average person is still just trying to cram a bunch of stuff in their regular ol’ car when heading out for a road trip. When you first fold down those back seats, it feels like you have infinite room for all of your stuff. But it fills up quickly, and space is valuable, so here’s how to pack like a pro when you’re just starting out.

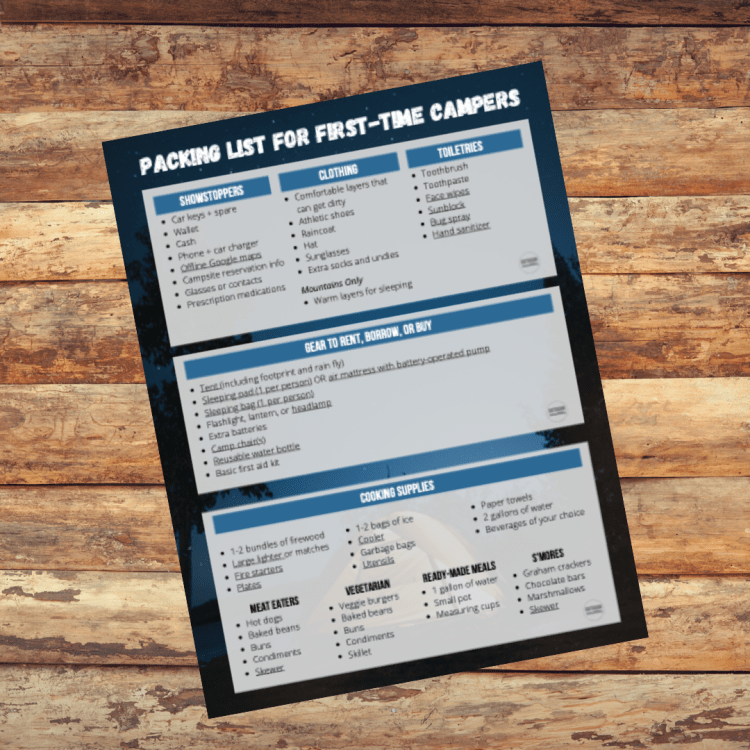
Download the entire list here and keeping scrolling for some beginner insight. This packing list doesn’t involve food, since that’s a whole other beast. I also have a guide for where to fit everything in your car so you can stay organized.

Show-stoppers

Show-stoppers are the basic things you won’t make it far without – wallet, keys, cell phone, etc – and that you also can’t replace quickly (like an ID or your glasses).

If you don’t already carry your health insurance card(s) in your wallet, pop them in there before you leave. Don’t leave home without your ID (obviously) and multiple forms of payment – for example, if your main credit card is American Express, make sure you bring a VISA or Mastercard as well since a lot of small business don’t take American Express.

A lot of small businesses also just don’t take credit cards and you can’t always count on ATM being immediately available. When we were in Alaska, the entire town of Talkeetna’s ATMs were out and many places only took cash. Fortunately, the pot shop had the one working ATM! Anyways, get cash out ahead of time, including some rolls of quarters for laundry along the way.

Another note on being out in the middle of nowhere – you may not have phone service to pull up that reservation information! Print all of your reservations (including campgrounds) out ahead of time and keep somewhere like the center console or glove box.

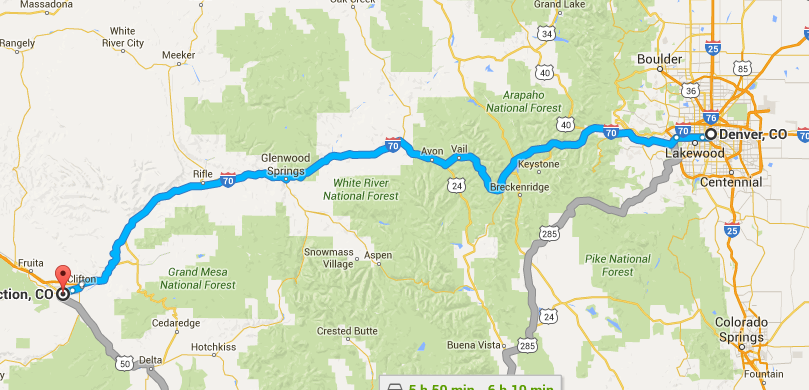
Google Maps allows you to download maps ahead of time for when you won’t have service. I highly recommend doing this before you leave so you don’t find yourself stranded in some random corner of the country. We’ve done this for our trips to Greece, Alaska, Yellowstone, Grand Teton, and around Colorado and it’s saved our butts multiple times!

You should always have these things when you’re driving, but just to double check – make sure you have a proof of car insurance (typically can be found/accessed in your insurance company’s app on your phone), up-to-date registration, your owner’s manual, and emergency supplies like jumper cables and a blanket. Bring both sets of car keys, too!

First-aid and medical supplies

It also goes without saying that all of these should be easily accessible – while it’s unlikely that you’ll have an emergency, you will need sunblock and bug spray regularly, so keep these things within arm’s reach!

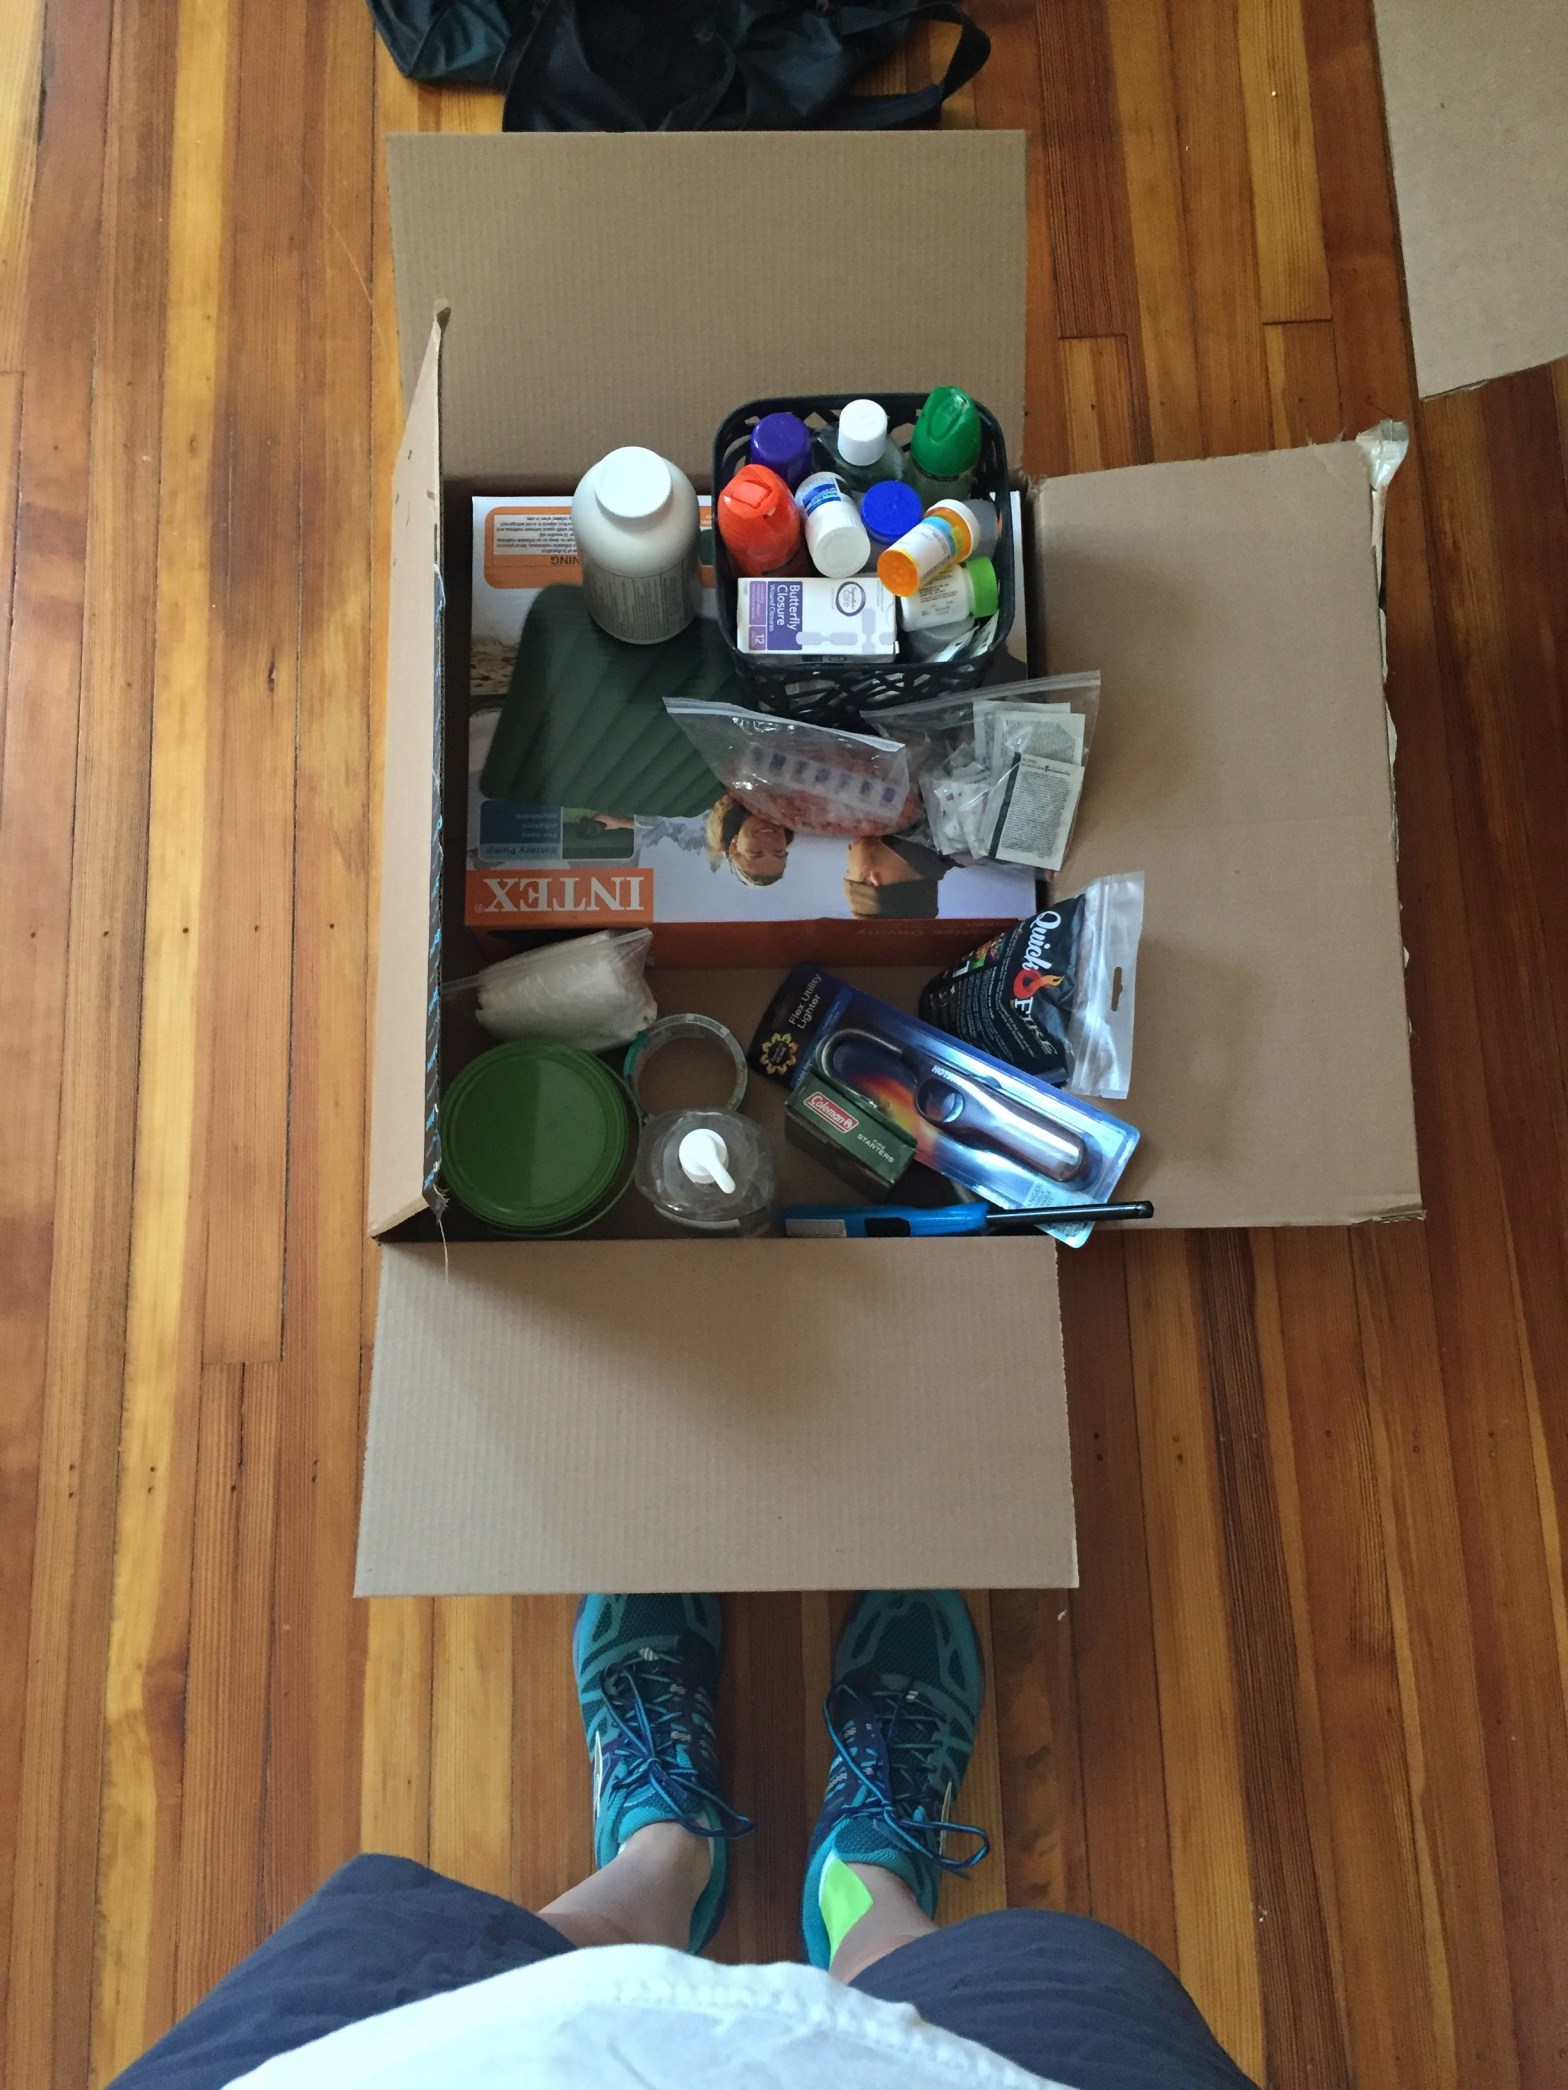
Skip commercial first aid kits and build your own with supplies on Amazon or at the grocery store – you’ll spend the same for practically a lifetime supply of items versus a kit with one or two of each.

I stock our basic kit with:

  • Antiseptic wipes (the linked ones don’t sting!)
  • Antibiotic ointment (get the generic at the grocery store for your cheapest option)
  • Band-Aids of varying sizes (the one thing I don’t go generic on since cheap ones always fall off)
  • Gauze squares and medical tape
  • Ibuprofen (optional but have saved me when cramps hit while hiking – buy a big bottle and then dump 20 pills in your kit)
  • Tums (optional, but make sure to put them in their own bag so they don’t get powder all over everything)
  • Generic Benadryl (even if you don’t think you have allergies)
  • Tweezers (for splinter removal)

I also never leave home without:

  • Sunblock (and aloe)
  • Bug spray (and anti-itch cream)
  • Chapstick with SPF
  • Hand sanitizer
  • Prescription medications (bring at least three days’ worth of extra)

Light and power

For everything you’re bringing with you that’s battery-powered, make sure you have a charger or extra batteries for it. This includes a digital camera, your phone (pack multiple so you aren’t fighting with your road trip companions for a charger), and definitely your air mattress pump (if applicable).

Test out things like your air mattress pump ahead of time to make sure it’s in working order and has fresh batteries.

I also like to bring a headlamp or other battery-operated lantern for rummaging around in the car at night. Headlamps are handy since they allow you to be hands-free, but you can also just the flashlight on your phone.

If you’re camping, make sure you’re also bringing multiple methods of lighting a fire – even if you get waterproof matches, you can’t always depend on them. If you have a lighter, make sure the fluid is full. And don’t be shy about getting artificial fire starters to help you out!

Clothes

I’m not hardcore enough to go an entire week without doing laundry. Plus, you can pack less if you’re only going three to four days between access to a washing machine. Calculate how much clothing based on when you’ll have access to laundry and what activities you’re doing.

Always throw in a extra underwear, socks, and other undergarments if you’ll be getting sweaty a lot. A fresh pair of underwear will go a much longer way then fresh shorts with gross underwear, after all!

Obviously, if it’s summer time and you’re planning on doing a lot of outdoorsy things, you’ll be going through more clothing, so pack accordingly. If you’ll also be experiencing cooler weather, aim to pack versatile layers that you can re-wear. Inevitably, it will be rainy or windy at some point during your trip, so bringing a raincoat is a must.

In an effort to save space, you may be tempted to bring only one pair of sneakers. I would suggest having at least two pairs of shoes so that you can change into something else after getting sweaty in your main hiking/running/activity shoes. This can also be accomplished with lots of extra socks, but in my opinion, heaven is putting on a pair of flip flops after changing out of sweaty sneakers.

In general, making sure all of your clothes go with each other and that your outfits are interchangeable will help you save space. Packing cubes help you stay organized and let you fit more in your bags, too.

Toiletries

A toiletries bag, no matter how basic, helps you keep everything in one spot that’s also easy to yank out of the car for when (if?) you do take a shower. I tend to keep my toiletries really basic for road trips, but if you want more beauty products, get after it!

These travel-size bottles have come in extremely clutch for bringing along my normal toiletries without taking up a ton of space. I fill them with:

  • Shampoo
  • Conditioner
  • Body wash
  • Face wash
  • Moisturizer
  • Face sunscreen
  • Body lotion (particularly handy for Colorado!)

Since you won’t always have access to running water, I also always pack face wipes (can be re-purposed as body wipes or you can buy body wipes too). Don’t forget the basics like a toothbrush and toothpaste, nail clippers, and deodorant.

Depending on where you shower, you may not have a towel accessible (ie if you’re showering at a campground) so pack that too.

Sidenote: whenever you’re camping, make sure to keep toiletries in the car so you don’t attract bears.

Gear

This is totally dependent on what types of activities you’re doing. I’ve got lists focused on each of those – what to bring camping and what to bring hiking.

No matter what, make sure you bring a water bottle or have a reservoir in your backpack to make sure you’ve always got plenty of drinking water handy. Keeping a gallon in the car is always a nice back-up!

If you’ll be in bear country, don’t forget your bear spray. There’s a 99.9999% chance you won’t need it, but if you do need it, you want to have it with you.

If you have a camera separate from your phone, make sure you have plenty of room on the memory card (or bring an extra one). Cold weather also kills your battery, so bring the charger with you, too, and charge that bad boy up all the way before leaving.

Miscellaneous

If you’ll be visiting a lot of state or national parks, do the math ahead of time and see if an annual pass makes sense for you. You can purchase the annual pass at the park entrance, or if you already have one, make sure you bring it with you and keep it somewhere handy like the center console.

Road trips are a great time for long conversations, but sometimes you’re tired of talking and want something else to pass the time. If you prefer music, download your playlists ahead of time so you can still listen when you don’t have service. Same goes for podcasts or audiobooks. If you have a Kindle, that will help you save space, but don’t let that keep you from bringing actual books to read too (just make sure you have a reading light too).

In the unlikely event something does go wrong, make sure you’ve sent your itinerary to friends or family so they know when you’re expected back.

The bottom line

Finding a balance between extra everything and saving space can be tricky, but prioritize bringing extras of things that would be a REALLY big pain in the butt to be without in the middle of nowhere. These are things like your phone and a way to make or buy food.

Once you’re trying to jam everything into the car, consult my guide for packing it all in and staying organized. If I forgot something, let me know in the comments!

Beginner’s Trail Guide: Matthews Winters Park

Less than an hour from Denver? Check. Beginner-friendly trails with a view? Double check. Like many of the parks in the Jeffco (Jefferson County) Open Space system, Matthews Winters makes it wonderfully beginner-friendly to get outdoors. It’s great to hike, bike, or run without sacrificing views or an entire day.

How do I get there?

The park is almost immediately off of I-70 at the Morrison exit, and while parking was jammed on Memorial Day we still found a spot relatively quickly at 11 a.m. All Jeffco parks are free (thanks, open space sales tax!) and have maps available at the trailhead.

Screen Shot 2016-06-08 at 6.10.18 PM.png

Make sure you navigate to the parking lot, not just “Matthews Winters Park.” Google tries to drop you off on the side of the interstate.

The entire drive is paved, as is the parking lot. Any car can make it there and you’ll be on major highways/roads the entire time.

Where do I go?

Directional signage can be pretty hit or miss at Jeffco parks, but fortunately, you don’t have too many options to get lost.

Three-mile (or less) hiking or trail running route

From the main parking lot, the Matthews/Winters trailhead is down the hill. You can always see it immediately from your car, but walk away from the road you came in on and you’ll quickly see the bathrooms and trailhead.

You’re given the choice of Village Walk or Village Ride. It wasn’t immediately obvious to me what those meant – Walk is for hikers and runners, Ride is for bikers. It’s really nice that they separate everyone at the outset, but keep in mind that you will run into mountain bikers on the rest of the trails.

Start out on the Village Walk trail and continue past the Red Rocks Trail intersection. Unless you want to only go for two miles, in which case this is a good turnaround point at the high point of the trail.

You may not have realized it, but you’ve been on the Red Rocks Trail ever since you past the intersection where Village Walk and Village Ride intersect. You also may not realize that you’re leaving the trail (for now) when you pass the second fork. That briefly turns into Cherry Gulch, which is the shorter route. This doesn’t *really* matter in the grand scheme of things unless you’re trying to follow a map or decide on a meeting point.

Ok so you’re on Cherry Gulch now. The trail goes down a rocky hill into the gulch, which involves a water crossing. It’s pretty easy to use rocks to make your way across without getting your feet wet. The creek was totally dry when I ran this in September 2020.

The next intersection is Morrison Slide. This is a very steep trail that goes up and over the mountain that will be on your right. Continue past it (do not turn right up the mountain).

To complete your three-mile loop and head back to the parking lot, stay left at the next intersection to rejoin the Red Rocks Trail. The sign is confusing because both directions point to the Red Rocks Trail. This is because the trail that continues past that is also the Red Rocks Trail (see below map). If you don’t turn left, you’ll keep going away from the parking lot.

Purple loop is the three-mile, super beginner-friendly route. You can keep going on the red route if you want to go a little longer. It’s mostly flat until you meet up with the Morrison Slide trail again, then you’ll be going downhill toward the park border.

Four- to Five-mile route

If you continue on the Red Rocks Trail away from the parking lot, you can hike for as long as five miles (or more!).

For four miles, there’s a really nice overlook toward the end of the trail that makes for a good place to stop to eat and sit in the shade. It’s at the top of some red rock formations, and the trail continues sharply downhill after that. Keep in mind if you continue on, you’ll be hiking uphill the entire way back.

It’s just over a mile to Red Rocks (the park and concert venue) from this point. If you hike as far as the boundary to Red Rocks (there’s a sign), you’ll do about five miles total.

Six-mile route

If you want to get into something bigger, particularly if you’re a trail runner familiarizing yourself with Front Range trail options, try this six-mile loop! For me, it’s a hard uphill run with a lot of rocks, but I like it a lot because of the beautiful views and general challenge.

You could do an out-and-back via Morrison Slide, but I haven’t personally done that so I can’t give you any insight. The loop I discovered with a trail running group takes you around Red Rocks, Matthews-Winters, and Dakota Ridge (across the street).

Instead of starting at the Matthews-Winters trailhead, head east out of the parking lot on foot and follow the cement path to the crosswalk across the highway. This takes you to Dakota Ridge. You start your run/hike with a butt-burner of a hike up the initial hill, and then follow the trail along the hogback for about three miles.

At the Dakota Ridge South trailhead, turn left and head down. You do have to run along the road (there is a wide shoulder) for a few minutes to hook back up with the trail. You’ll see the parking lot and trail sign quickly. Go behind the trailhead sign and back up again onto the hogback, following signs for Dakota Ridge (not the bike trail) and heading downhill over the hogback.

Cross the road into Red Rocks, running along the shoulder until you see the trail sign on your right. Follow that trail until you hit Matthews-Winters. This is a long, slow but steady climb! It’s not steep at all, just a gradual uphill (that kicks my butt). Based on the above loops, pick your preferred trail to get you back to the parking lot.

IMG_0986.JPG

What Should I Wear?

There is little to no shade on this trail. That means lather up on sunscreen because Colorado sun doesn’t eff around. I would suggest also wearing a hat as my fivehead narrowly avoided sunburn, even with sweatproof sunscreen. Bring sunglasses to complete the trifecta.

There are two places where you have to cross a small stream, which as you may have guessed are the only other two spots of shade on the trail. You can wear waterproof hiking boots if you have them, but the trails aren’t that difficult, so you’ll also be fine in sneakers.

There are rocks to step on at the larger crossing and you can (theoretically) jump across the smaller one. If you don’t stick the landing (guilty), it’s hot and dry enough out there during the summer that your feet will dry quickly anyway. In spring and winter, these sections have a tendency to get very muddy so be prepared for wet feet if you don’t wear waterproof shoes.

For the most part, the trails are very well-maintained and not difficult. There are a few more technical spots that get rocky, but nothing extreme. Matthews Winters is relatively flat, so it’s a great place for beginner trail runners as well as hikers.

IMG_0987

Is It Crowded?

Yes, very. It’s one of the most popular close-to-Denver options. The nice part of all the sun means it’s busy year-round since you can stay nice and toasty in winter. If you head out early (before 8 am) you will have significantly fewer people.

You’ll have to share with mountain bikers and horses. There are more of the former and I was pleasantly surprised at the lack of horse poop on the trail. Both parties have the right of way, so be careful stepping off the trail.

Please keep in mind that when you are sharing the trail, the other users have every right to be there too. Yes some bikers are rude, so are plenty of runners and hikers. Yield to other people and generally just understand you aren’t the most important person on the trail. We’re all here to enjoy!

Anything Else To Know About?

Matthews Winters seems to get a lot of attention for rattlesnakes, but I can’t imagine this is an issue on the weekends. Probably because I didn’t see one and I need to tell myself that to sleep at night, but also because the volume of people tromping around doesn’t make for a peaceful place to sun yourself if you’re a snake.

If by some awful stroke of bad luck you get bitten by one after reading this blog, don’t sue me because I’m not a wildlife expert or ranger or in anyway qualified to be making such sweeping generalizations about rattlesnakes.

Despite the fear-mongering headline, this news article actually has great advice for rattlesnake safety (chalk that up under things I never knew were a thing before I moved to Colorado).

Now that you’re good and scared of the outdoors, get out there! In all seriousness, wildlife is a part of life in Colorado but as long as you know what to do when you see wildlife (Colorado Parks and Wildlife’s blog is a great resource), you will likely be fine. Again, not an expert, just good at Googling things for you. Don’t let the fear of the unknown keep you from trying things out!