If you work a nine to five, chances are you’re running in the dark November through February thanks to the end of Daylights Savings Time. That means cars, scooters, skater bros, and other mindlessly motoring around people have a much harder time seeing you. Fortunately, there are plenty of budget-friendly options for reflective gear to keep you safe while you’re out there crushing it.
Reflective Vests
You’ll get the most bang for your buck with a reflective vest, however, not all vests are created equal. There’s the “singlet” style, which is eerily similar to the safety patrol belt you may or may not have worn in elementary school. I wasn’t chosen as a safety patrol. Scarring childhood memories aside, a vest or singlet is up to your personal preference.
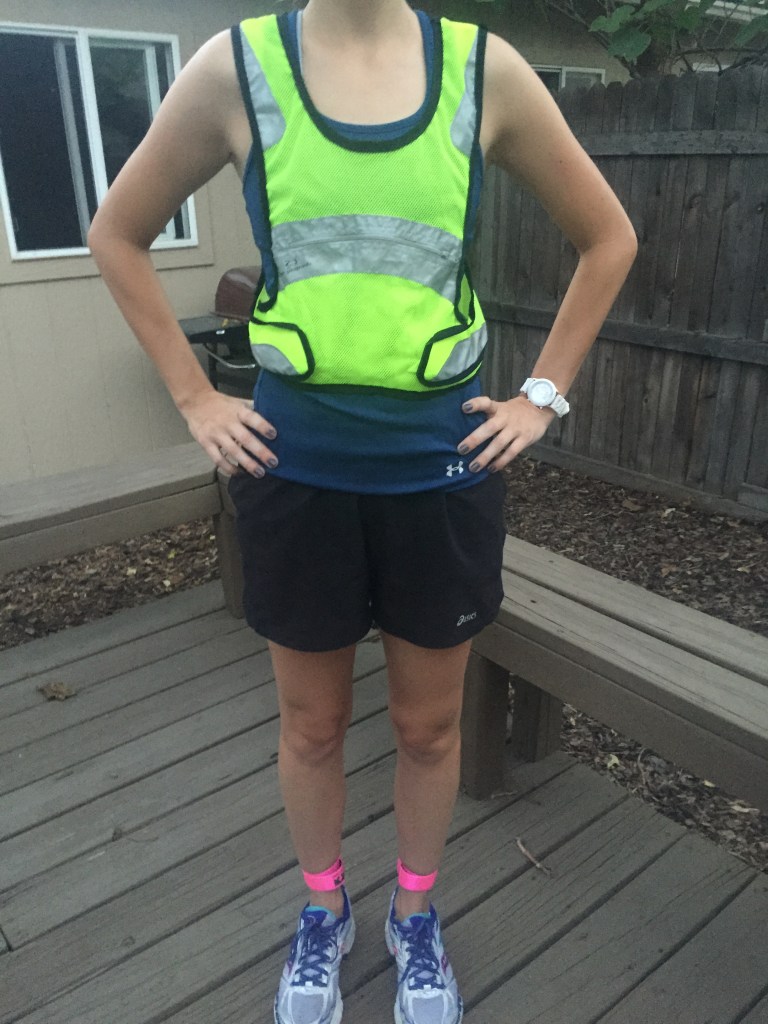
I wanted something with pockets or storage, so that ruled out singlets for me. I also didn’t want to spend much, so I opted for the Amphipod Full-Visibility Vest.
I liked it because, as the name suggested, it has a ton of reflective material on it. You’re about as close to glow-in-the-dark as you can get. Plus, it has a zipper pouch in the front, which is awesome since lady’s running tights don’t usually have pockets larger than a pinky nail. I’ve kept keys, my ID, an extra ear warmer, snacks, and more in that pouch. It’s super handy and surprisingly roomy.
It goes over your head and adjusts with straps that wrap around your waist. There are two sizes, Small/Medium and Large/XL. I’m typically an extra small or small in shirts, so I opted for the Small/Medium. It’s a little big on me even when I’m bundled up. If you’re small and want a super snug fit, you may need a different vest that comes with more size options. I can’t speak to how the sizing is for anyone larger, so if you have feedback for that or suggestions for a more size-inclusive option please let me know so I can update this post!
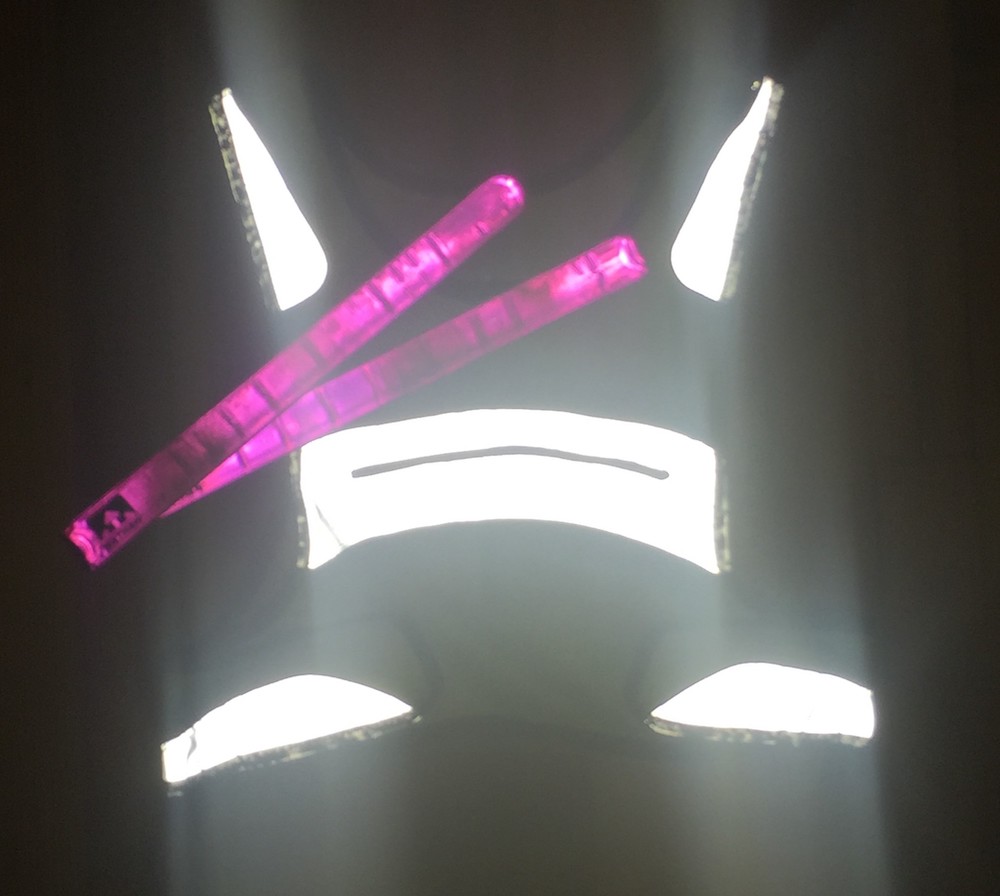
Looks fly…
…and they weren’t lying when they called it full visibility!
Reflective Arm or Leg Bands
What are those snazzy pink bands in the photo? If you grew up in the 90s, you should know. For some unknown reason, Nathan (a company, not a random man) decided to use the glorious technology of snap bracelets for reflective gear. My 90s nostalgia initially attracted me to them, plus they come in lots of fun colors and are just over $10.
I do like that they fit around my ankles, because I feel like there’s a greater chance of a car’s headlights catching my moving feet instead of my wrists. I got used to having something around my ankles pretty quickly, but make sure to wear them over your leggings or sleeves. I found that they made me a little bit itchy once I got really sweaty if I wore them right on my skin. Here is another option with better reviews, but I haven’t personally tried them.
I wore the darkest clothes possible to demonstrate safe nighttime running. It’s a good thing I’ve got all this reflective gear.
The bottom line
I wear both the vest and the anklets because my neighborhood is poorly lit and drivers here have a very loose interpretation of what red lights and stop signs mean. The entire get-up is not too ridiculous looking, and the entire set-up will run you about $40.
No matter whether you’re running around the block, live in the city, or are out in the ‘burbs, wearing reflective gear is the easiest way to stay safe when you’re getting those winter walk-runs/jogs/runs in. Stay safe out there and happy running!
The Elk Falls Overlook is one of the more iconic views of Staunton State Park (after Lion’s Head at least), and the trek out to see it is perfect for a beginner looking to push into longer distance hikes. It’s a challenge, but not out of reach for a beginner as the trail isn’t too technical and you aren’t at an unreasonably high elevation.
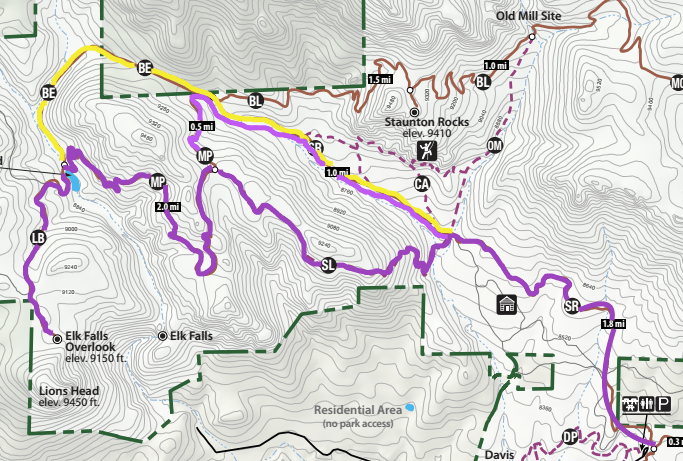
Somewhere between reading the CPW website and setting out on the hike, we managed to forget that Bugling Elk is the shortest way to get to the overlook from the main trail. This trail is 10.8 miles roundtrip. The route we took was just under 13, a few miles of which included some intense switchbacks, so probably not our best decision. In retrospect, I have absolutely no idea how we decided our route was the most direct.
You will receive a trail map from the ranger station when you enter the park, but if you want to do research ahead of time you can download it here. Our route is highlighted in purple. The shorter route is in yellow.
All of those zig zags? That’s where it hurts.
Staunton State Park is a great place to go hiking in general because of all the amenities it offers. There are trashcans and port-o-potties at the major trail junction along Staunton Ranch, the trails are really wide and very nicely maintained, and the parking lots have picnic areas, bathrooms, and water fountains.
I’ve blogged about the Staunton Ranch Trail before, so I’m going to mostly skip over that part of this hike. It’s the easiest part, has great scenery, and if you just hike that to the junction about 2 miles in, you’ll still have a great time. We opted to take the Scout Line trail from there, which turned out to be super scenic. There are some pretty incredible overlooks on the trail, and it gives you a little taste of what more technical trails might be like. Click to make the pictures full size:
Beginning of the trail. Lovely tall grass, wide trail, and pretty level.
Starting to climb and get a bit more narrow. But how gorgeous are the woods?
First big overlook that keeps getting better the higher you climb. Absolutely beautiful.
Most technical part of the trail.
Second and final really technical part of the trail.
Awesome overlook at Lion’s Head toward the end of Scout Line (before you reach Marmot Passage)
Once you reach Marmot Passage (you’re at 3.3 miles at this point), you’re really going to start sweating. Marmot isn’t a technical trail, but there are lots of switchbacks, plus you’re still going uphill at this point. You will reach an overlook where you can see a nice pond, but that pleasure soon diminishes as soon as you realize you have to get down to the pond…and then back up here afterward. This is why you should take Bugling Elk.
And you’re down…which only fills you with the sense of dread because you have to go back up. If you continue straight here, you take Bugling Elk.
After the pond, you start climbing back up. And by that I mean there’s a HUGE incline you have to get up for the last part. You really have to work for this overlook. You’re on the home stretch, so try to focus on that…and how easy it will be walking back down!
The final ascent.
Once you’ve reached this point, you’re basically there. It’s literally less than three minutes from this point, especially if you’re power-scrambling out of desperation to be “done.” The overlook is totally worth it though. You have a nearly 360 degree views of the mountains. Elk Falls is actually a pretty small part of the overlook, and in my opinion, mostly a nice afterthought considering how breathtaking the rest of the view is. Again, click for full size photos:
Close-up of the falls.
Gorgeous.views.everywhere.
Seriously, everywhere.
Tired, but very happy hikers!
As I’ve mentioned, if you took Bugling Elk, you will not be as unhappy on the rest of the hike. We took Marmot Passage all the way back, bypassing Scout Line, and the last several miles of Staunton Ranch HURT. We ended up covering about 13 miles, which was a personal record. My feet may have been killing me, but it was perfect to push myself with a more advanced hike than what I was used to. This hike is a great opportunity for fellow beginners looking to challenge themselves a bit.
Since this is a long hike, you will need to stay hydrated, bring snacks, and dress appropriately. Lucky for you, I’ve got blogs for each of these! What I don’t have a blog for is the weather, since it’s always changing…so please make sure to check it and exercise caution when deciding whether to hike.
When I moved to Colorado in 2013, I’d never been on a pair of skis in my life. The concept of being excited for winter was still completely foreign to me. I’m from the East Coast, where winter is basically three months of grey, bone-chilling misery.
Figuring out what to wear is one of the hardest parts of trying out a new sport. I admit I had an advantage – I used to work outside, so I had already shelled out some money for warm, waterproof pants. But my jacket is the same winter coat I’ve had since high school (well, I finally upgraded it in 2019). And one time I forgot those warm, waterproof pants, so I just skied in Billy’s sweatpants and everything turned out fine (fortunately I didn’t have any epic wipe outs that got me covered in snow).
Your ultimate priorities are plenty of layers topped off with warm and waterproof outerwear. If it’s not actively snowing, you’ll still appreciate waterproof layers if you fall and get covered in snow.
Base Layers
The most important part of any winter recreation outfit is your base layer. This is the layer closest to your skin. For skiing, it should be moisture-wicking and not too bulky. A cotton t-shirt will get wet with your sweat and stay wet, so some sort of synthetic fabric is your best bet. Under Armour Cold Gear is my favorite, but any non-cotton, long underwear type shirt and leggings will do. REI’s long underwear is actually pretty affordable. I typically wear an Under Armour top and winter running tights as my base layer.
If it’s not going to be sunny while you’re skiing, you will want to layer up a little bit more. For example, I’ve got some baggier long underwear that I’ll actually put over the running tights to really trap in all the heat. The long underwear are basically up to my armpits, so yeah, it’s a pretty hot look. But I’m using what I have!
Finish off your base layers with socks that come up to your knee. If you don’t have socks that tall, at the very least make sure they come up over your ski boots. You can test this when you pick up your boots at the rental place. If your socks aren’t higher than your boots, they’re going to bunch up and cause you a lot of shin pain. Ski boots are already uncomfortable, don’t make it worse! Wherever you’re renting skis from will have socks for sale, so you can always pick up a pair while you’re there.
Ladies, I highly recommend a sports bra so you have moisture-wicking from head to toe.
Middle Layers
Once you’ve got base layers established, you can start adding some bulk to trap heat. Your base layer wicks moisture and keeps you dry while middle layers keep your body heat from escaping. This is why it’s so important to not use cotton base layers – they won’t ever dry out, and you’ll be wet and freezing.
This is too many layers. Stop before you get to this point.
Here’s the typical progression I use:
Base Layer
Slightly thicker long sleeved shirt
Form-fitting fleece
My outfit is a mix of what I already had in my closet, what I’ve gotten a deal on, and a few legit investment pieces I got after deciding I did actually enjoy being outdoorsy. I got my puffy vest for $20 at the Gap outlet but also have a really nice fleece from REI that was closer to $60. Unfortunately, they don’t make it anymore, but REI still has lots of great options.
In general, try to wear one less layer then you think. I overdressed for the first few years of skiing because I was always so cold in the parking lot. But once you get going downhill (the ride on the lift will also be a little cold) you’ll warm right up, especially if you’re in Colorado and the sun is out.
Outerwear
I accidentally bought a snowboarding jacket back in high school (yes, I still wear the jacket I was rocking on the bus stop corner circa 2005). This means it had a pocket for goggles, and the armpits unzip (a feature I was thoroughly confused by while freezing my butt off at said bus stop, but now appreciate). These are nice features, but they’re not must-haves.
Whatever winter jacket you have is fine as long as it’s waterproof and not knee length. You do want to be able to move around in it, but let’s be real, it’s not like you’re going to be giving Lindsey Vonn a run for her money your first few times out. It’s not important to have the latest ski wear – just warm and waterproof!
Waterproof, insulated pants were probably the biggest advantage I had thanks to my previous career working outside. Ski pants can be pricey, and I already had waterproof, warm pants that fit over leggings/sweatpants and kind of fit over my ski boots.
If you have warmer non-waterproof layers, you can save a few bucks by getting rain pants to put on top of them. Rain pants are generally cheaper than ski pants, and work just as well. They just won’t fit totally over your ski boots, but that’s not functionally important (just fashionably, if you really care).
The reason you can’t just wear sweatpants is that if you fall, you get snow all over you. The snow hits your body, melts, and then you’re wet. And then you get cold. Basically everything you wear is to avoid getting cold or wet or both. But like I said at the beginning of the blog, I forgot my waterproof pants once and had to make due with Billy’s extra pair of sweatpants over the leggings I was already wearing. It wasn’t ideal, but it wasn’t the end of the world, either!
Headgear
“How bright could it possibly be?”
“It’s winter, why on earth would I need sunglasses?”
This was me (with plenty of eye rolling for effect) on my way to my first ski lesson. I stepped outside, looked up towards the mountain, and was promptly blinded. Fortunately, Copper had plenty of sunglasses to choose from that were all under $20 and not totally tragic looking.
It’s all fun and games until you’re squinting for four hours straight.
Goggles will run you around $50 or more, so I just used sunglasses and kept a close eye on sales. I ended up picking up a pair of goggles on sale for under $20 in the off-season. Goggles are safer than sunglasses since they are less likely to shatter if you fall, so keep an eye out for sales! The less concerned you are about having cool goggles, the quicker you will find cheap ones that work just fine.
A helmet is another must-have, but one that is rentable. This is another great item to save up for and keep an eye out for sales! Ski helmets have little pads that cover your ears, so you shouldn’t need an ear warmer or other ear covering. If you find your ears are getting cold, you can really only fit something super thin like a Buff underneath your helmet. You’ll be surprised with how warm you stay, though! I also bring a beanie/warm hat and keep it in the car for the ride up and back from skiing.
Accessories
For the love of all that is holy, do not forget gloves!! And hand warmers and foot warmers. But you will be absolutely miserable if you don’t have gloves. Again, it’s ideal if these are waterproof, but not absolutely necessary. I happened to have waterproof mittens laying around (thank you, going to college in West Virginia) but I’ve made it work without.
If you’re buying something new, mittens are warmer than gloves since your hand/finger heat is all trapped in one spot instead of separated out. You can easily hold onto your ski poles in mittens, so you don’t need the dexterity of gloves!
The bottom line
Any way you slice it, there’s no cheap way to go skiing. So do the best you can to borrow and beg your way into some warm and waterproof layers for your first time, and then if you decided you like it, keep an eye on sales to start stocking up on your own things.
You’re going to be colder sitting on the lift than you are skiing back down the mountain. Just remember that if the wind is in your face going up, it’ll be at your back going down! And once the sun comes up over the mountain, you’ll warm up quickly too. That reminds me – pack your sunblock and chapstick and reapply frequently, including on the bottom of your nose!
After seeing this listicle on Women’s Health and understanding none of it, I thought I’d remix “16 Things You’ll Only Understand If You’re A Runner”….for beginners.
1. You are no longer fazed by getting lapped by everyone at the park, including elderly dogs and small children.
2. The only gadget you own is the free version of MapMyRun, and occasionally feel like you’re being taunted when it says “TIME: 15 MINUTES. DISTANCE: 1 MILE.”
3. You dream of breaking an 11-minute mile.
4. “I definitely have been running for at least 20 minutes.” *Looks at watch* “Oh cool, it’s been 45 seconds.”
5. Being out of breath is your new comfort zone.
6. You have a recurring nightmare of being last to finish the 5k you’re aiming for.
7. When an acquaintance invites you to run with them and you don’t know how fast they are…..
8. You cannot begin to fathom how you could possibly run so much you lose a toenail.
9. You are still chasing the illusive fantasy of “runner’s high.”
10. You click on an article about “short runs,” only to realize they are still talking about a longer distance than you can even imagine walking.
11. Walk/run game STRONG.
12. You have discovered the wonders of not wearing any underwear with your running shorts…and never run long enough to encounter a reason not to (is pooping your pants REALLY that big of an issue??)
13. You’ve learned a new definition for “dirty” laundry. #whyiseverythingsowet
14. Your top speed is considered the warm-up “jog” at the running clinic you attend.
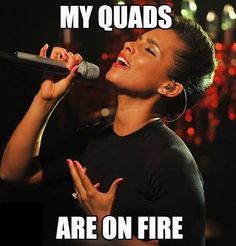
15. You can’t touch your toes…but dream of one day doing so.
16. And last but not least…you don’t understand half of the things serious runners talk about.
My friend Melissa ran the 2016 Broncos 7k, and it looks like race management really took last year’s issues to heart! Melissa shared this picture of the newly revamped finish line, which they managed to widen without damaging the turf. I can’t speak to the new course, but it also looks like the tshirts also got an upgrade. Maybe I’ll come back in 2017!
Photo by Melissa Aaron
Back to the original post:
It’s almost that time of year in Denver! The Broncos 7k ushers in the beginning of football season, and the unique football-tribute distance (7k…that’s 7 points for a touchdown for you Sports Fans out there) makes it a great transition race for those looking to move up from a 5k. In theory, the race is great – you get to run on the field, lots of freebies, pretty course – but in practice, the logistics need some work.