Beginner’s Travel Guide: Three Winter Days in Ouray, Colorado

Camping is great, but not in the winter. Staying in a hotel doesn’t make you any less outdoorsy, and you can keep enjoying Colorado year-round if you take advantage of the great indoors during the colder months. I spent a long weekend in Ouray, and this southwest Colorado town is the perfect winter getaway.

window.wanderlogEmbedKeys=window.wanderlogEmbedKeys||[];window.wanderlogEmbedKeys.push(‘vifqbmtaii’);window.wanderlogEmbedOptions={“alwaysShowRouteLines”:true,”version”:2};!function(){var c=document.querySelectorAll(“script”),r=!1;if(c.forEach((function(c){“https://wanderlog.com/embed.js”===c.src&&(r=!0)})),!r){var t=document.createElement(“script”);t.async=!0,t.src=”https://wanderlog.com/embed.js”,document.body.appendChild(t)}}();

When to go

I went to Ouray specifically for the annual Ice Festival, which was an really cool (and free!) event. It takes place every January and is fun to check out even if you aren’t part of the ice climbing world (which, let’s face it, the majority of us aren’t…that’s what makes it so interesting). The ice park itself is completely unique – it was the first of its kind and remains one of the biggest (and best) in the world.

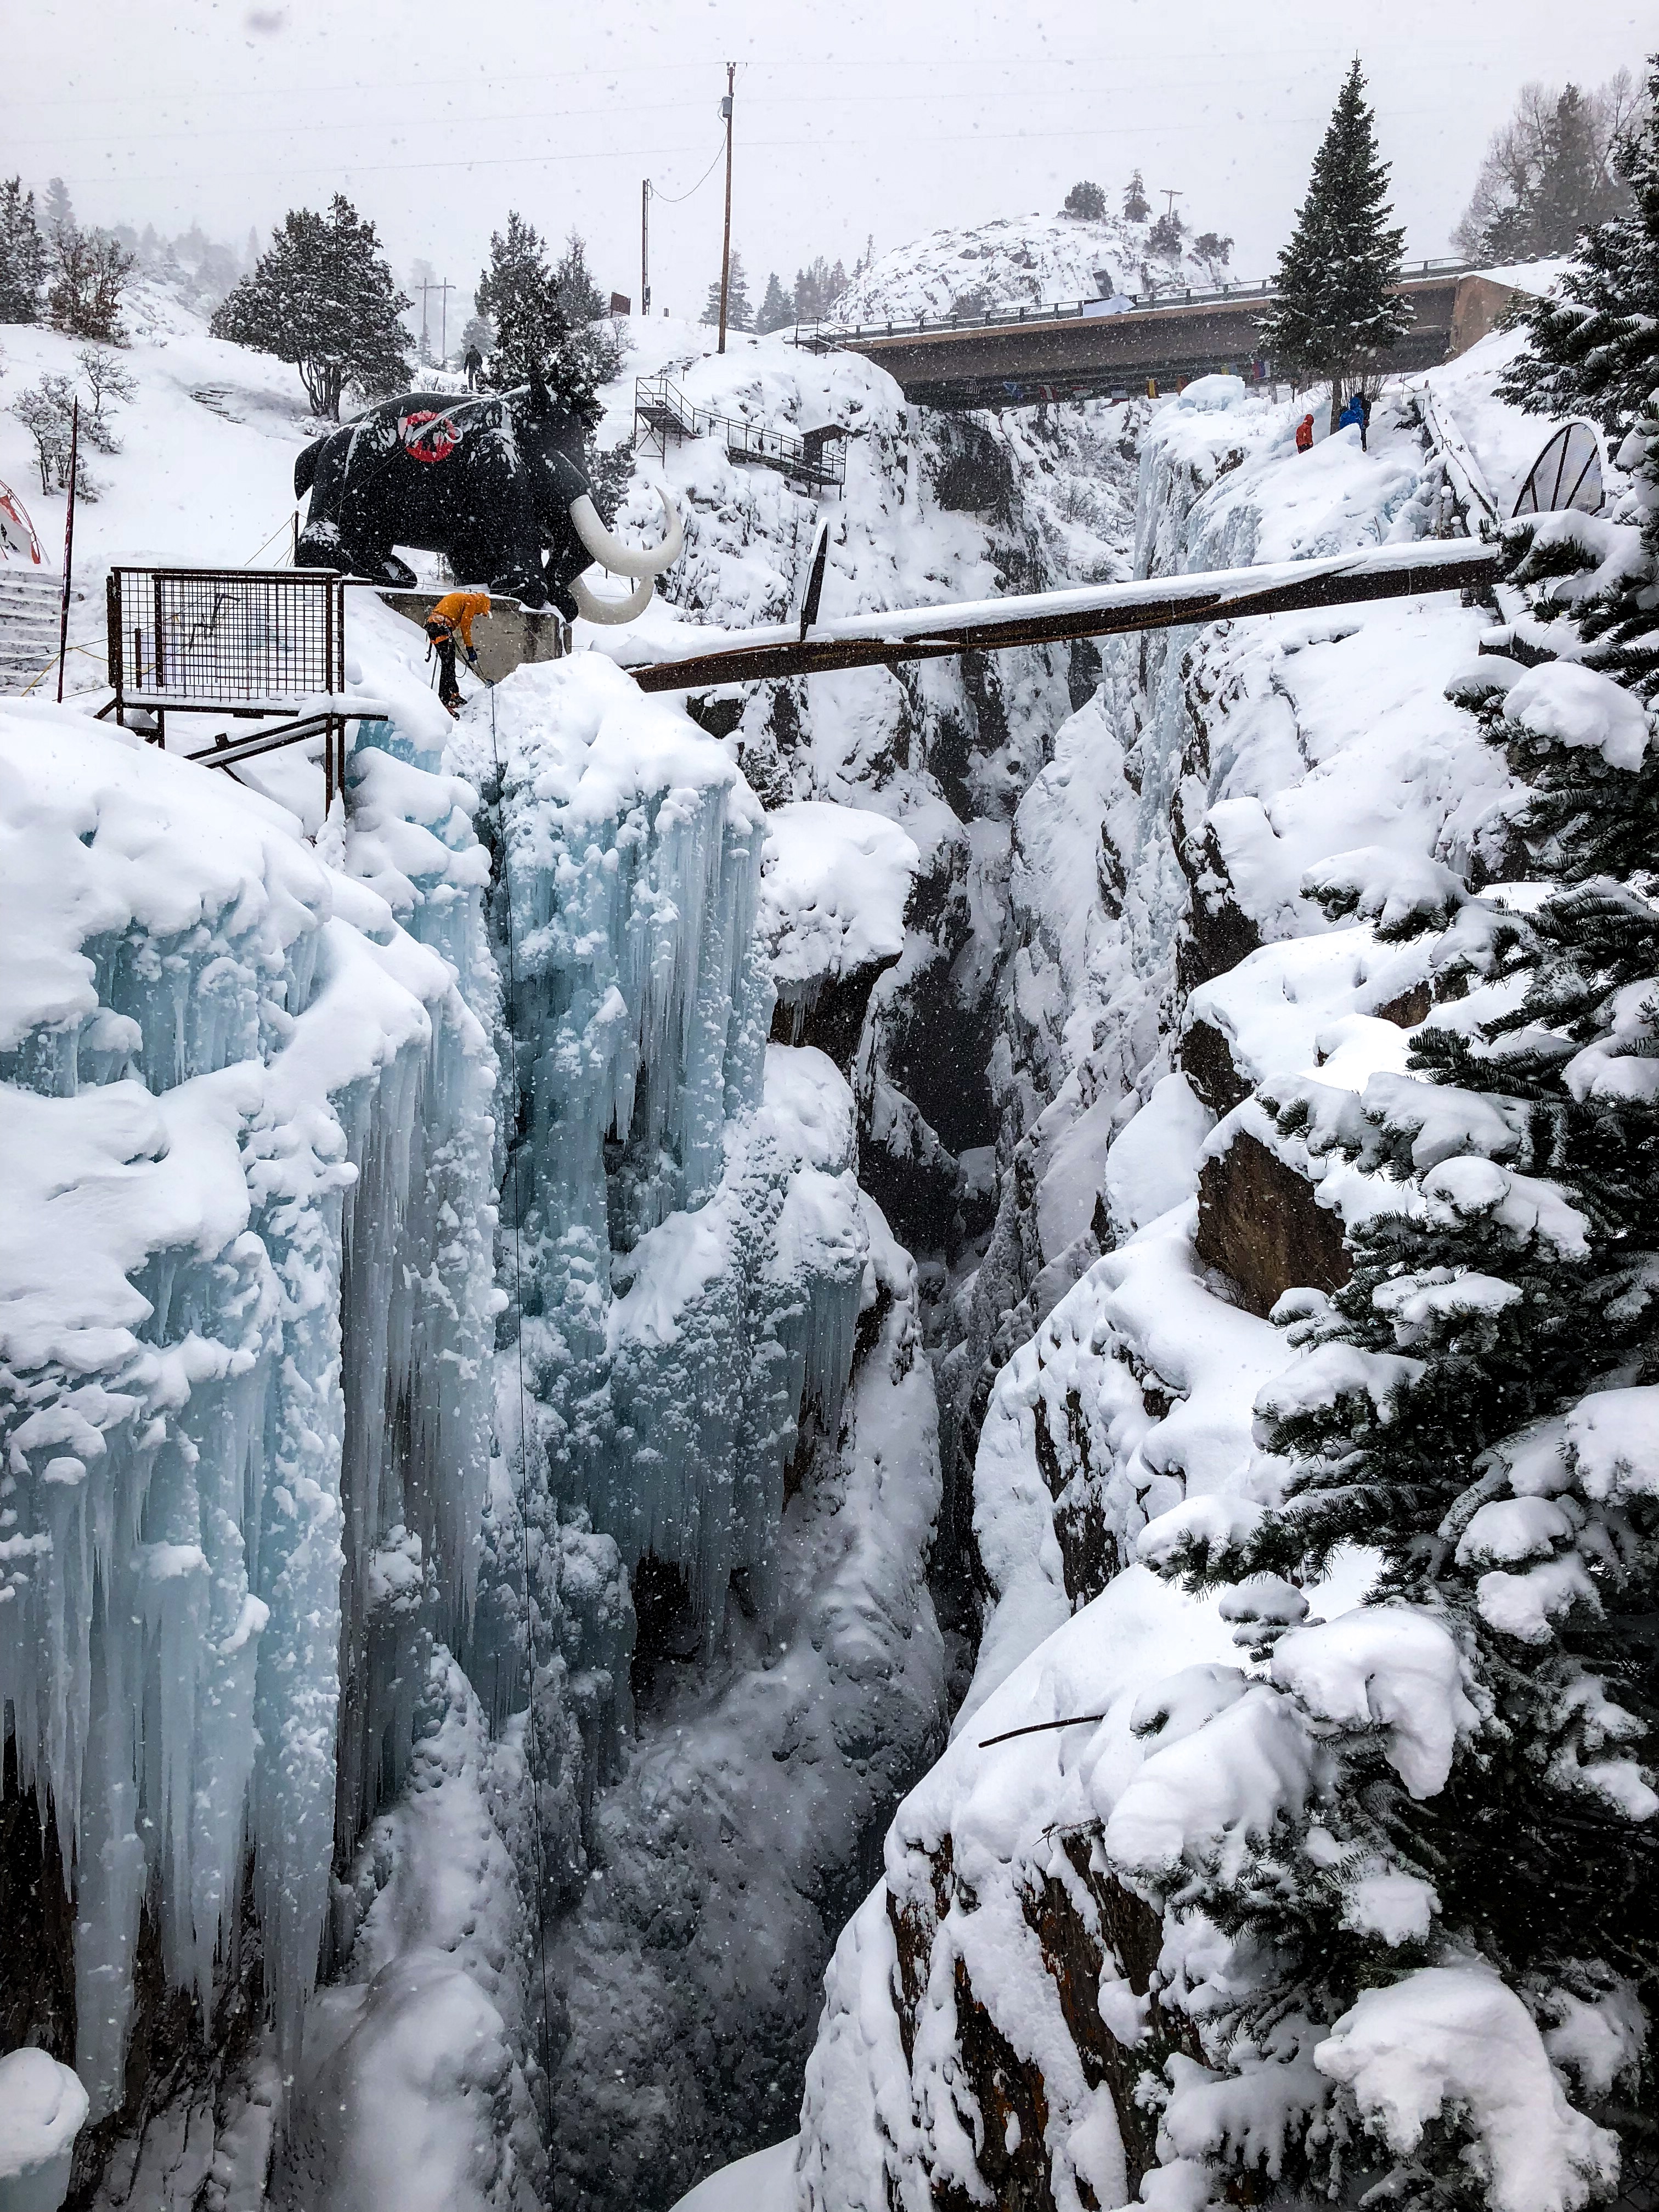
In between checking out competitive ice climbing and chugging hot chocolate, you can try ice climbing yourself. For free. With no experience. Or gear. I did it, and it was a bucket-list-worthy experience. Even if you don’t visit Ouray during the ice festival, you can check out the ice park anytime between December and March. It’s free to just walk around, and there are always people climbing!

Where to stay

Fair warning: Ouray isn’t the most budget-conscious of places. But that does mean you can stay in a sweet bed and breakfast for the same price (or cheaper) as the Comfort Inn. We were the first guests at the AlpLily Inn, and if I hadn’t already made reservations via work at the aforementioned Comfort Inn, we never would have left.

The AlpLily is owned by Jen and Mike, who spent the last few years renovating this insanely beautiful Victorian home. Our room was spacious and beautifully decorated, WiFi was fast, and breakfast was to die for. Jen made us a quiche with a lattice of bacon on top. A LATTICE OF BACON. Jen is also a full-time teacher, so in 2019 they had to cut back on their breakfast offerings – call ahead of time to make sure you can still eat there!

Jen and Mike were super generous hosts, even offering us towels for the hot springs after we checked out. We were so sad to leave the AlpLily, and will definitely be staying there next time we’re in Ouray.

What to do

Try ice climbing

Even during the winter, Ouray has a ton of outdoor activities. If you want to try ice climbing and aren’t in town for the festival, you can sign up with a local guide group like Chicks With Picks or San Juan Mountain Guides. The ice festival itself also offers clinics for under $100 for any skill level (you can borrow gear from the festival sponsors).

Soak in the hot springs

Beyond the ice park, the Ouray Hot Springs is another must-do. Go at night for some excellent stargazing. If you’re really lucky, you can go while it snows. We did, and it was like sitting in a hot tub snow globe.

main street in ouray colorado

The hot springs are really well laid out, so even though it was busy when we went we never felt like we were crowded. Our entry was half off thanks to all the snow making the pool “too cold.” It was still 102 degrees, so we certainly weren’t complaining.

If you forget your swimsuit, it’s only $2 to rent one. The Walmart in Montrose (the closest large town) didn’t have swimsuits in the winter, so we took our chances with the rentals. I was desperate enough that I was okay with borrowing a swimsuit, and they did seem really clean. Obviously not ideal, so just remember yours and avoid this situation altogether!

Enjoy a winter hike

Like neighboring Telluride, Ouray has a great trail system that leaves right from town. The Perimeter Trail can be picked up from Oak Street, by the Ouray Visitor Center, or by Cascade Falls (among other spots). It’s initially steep, but otherwise a pretty easy hike, and you definitely don’t have to go the entire 4.2 miles around Ouray.

This trail is so popular that even in the winter, the snow stays packed down and it stays hikeable. I was planning on running it….until we got 18 inches of snow. In that case, you can make a nice loop around town that still has beautiful views (and plenty of hills…so expect to walk more than you run).

Explore Ouray history

One last thing. This obviously isn’t an outdoors activity, but you should also try to do the guided tour at the Ouray Alchemist. We couldn’t fit this in with my work schedule and were so bummed. It’s a really cool historical Wild West tour (think actual snake oil dealers) that had rave reviews online. Just make sure to call ahead to schedule your tour.

Where to eat

Brick House is really popular but pricey, so if you’re looking for a nice dinner date look no further. The menu changes regularly, but I had elk ravioli and it was delish. The wine and desserts are also to die for!

Mouse’s Coffee and Chocolates – The name gives you all the information you need. This is your go-to coffee spot. If you can’t decide on chocolates, get a scrap cookie instead. It’s all the chocolate scraps mixed into a family cookie dough recipe. They are addicting. Pair that with a Shot in the Dark (coffee + espresso) and you have a perfect morning pick-me-up.

Ouray Brewery – Their beer is awesome and they have great burgers and BBQ in a really cool setting (sit in the swings at the bar on the main floor!). Red Mountain Brewery is also in town, but we didn’t make it there. If you want to do a brewery crawl, end at Red Mountain since it’s closer to AlpLily.

Thai Chili + Maggie’s Kitchen – Both excellent lunch options. Thai Chili had slow service, but fantastic pad thai. Maggie’s had one of the best burgers and fries I’ve ever had.

The only place I would recommend not going is Buen Tiempo. I normally don’t single out businesses like this, but the food was really not good. I don’t want you to go through the same trauma of craving some good Mexican food, and then suffering through theirs.

Buen Tiempo aside, you’ll love everything about Ouray. It’s totally worth the six-hour drive from Denver for all of its mountain town charm and activities. Don’t let the cold temperatures intimidate you – there’s plenty of outdoor fun to be had in Ouray all winter long!

Beginner’s guide to ice climbing in Colorado

The thing I love the most about Colorado is how everyone embraces winter, and I took that love of winter to a whole new level this weekend. I spent four days at the Ouray Ice Park for its annual ice festival in southwestern Colorado.

The ice park prides itself on welcoming climbers of all abilities, and the festival hosts clinics for all ages. At first, I was bummed the women’s intro clinics were taking place before I got to town. But once I got there, I was introduced to the “adult walk-up wall.”

ANYONE can walk up to the wall, get gear, and try ice climbing. For free! The whole festival was free but the fact that this incredibly cool experience was also free and open to beginners was amazing. They prefer you’ve gone rock climbing before, but you don’t need to know anything or have any gear.

I went Sunday morning and had my saint of a husband stand in line for me while I got gear (which did take a while since the crack squad of teenage volunteers weren’t super efficient). The wait was up to an hour on Saturday afternoon, but I only had to wait a few minutes on Sunday morning.

There was also a significant amount of crampon (spikes on your feet) troubleshooting (very nice teenager but not super accurate) once I was actually about to start climbing. I took about three steps and my left crampon came right off into the snow.

The wind was gusting up to 40 miles per hour at this point, and my (again, saintly) husband stood out in the elements to take photos while they tinkered with my crampons for what seemed like forever. Everyone was really nice and I was so excited it didn’t really matter that it was taking a long time (plus, it’s free, so who can complain?).

Once my crampons were actually on the right feet, the right size, and properly fastened, it was time to get started. For once, my fear sweats were not kicking in, which I can either attribute to becoming more confident or not having any more anxiety left after spending the weekend talking to strangers for my day job.

Then they handed me the two pick axes you climb with and I got really excited.

I felt extremely badass with my pick axes, even if there was a steep learning curve to how hard I needed to hack into the ice with them. But once I got the hang of that, I was surprised by how well everything stuck in the ice. I felt super secure and it seemed easier to me than rock climbing did.

I was far from the only person who had absolutely no idea what they were doing, and the belayers were all super experienced and excited to share their knowledge. It was the ideal beginner environment. It was pretty surreal to be scaling this giant frozen waterfall (man-made, but still) in snow globe-like weather. I felt very Coloradan.

IMG_8751
Not bad for a scaredy-cat from Maryland!

Now you may want to poo-poo the fact that the ice is man-made and not natural. BUT that’s what makes it so unique and beginner-friendly. The Ouray Ice Park was the first park of its kind and set the bar for others like it all over the world.

Before the park was established, ice climbing was only something you could do if you were down for miles and miles of backcountry hiking in avalanche-risky areas. Yeah, so not that many “regular” people. Thanks to the ice park, you can drive about a minute out of town and start climbing.

Although we were on the child’s wall, I didn’t make it all the way to the top. The snow was pelting my face and I also didn’t want to get trapped up there if I started freaking out. I realized when I tried rock climbing that coming down is actually the scariest part.

I had to take a few deep breaths and force myself to let go of the ice (no small feat) and lean back to get back down. It still scared the pants off me (temporarily), but no one judged me that I came down early and I also wasn’t the only one who didn’t want to go all the way up.

It’s wild to watch the pros, who make big moves to climb the ice and fall pretty regularly, or the climbers in the speed competition that just swing around after finishing. It seemed so natural to all of them to let go, and falling wasn’t a big deal at all. I’m still working on getting there.

IMG_0931
The day before, when it wasn’t blizzarding.

If you want to embrace winter in a way that can only be done in Colorado, head to Ouray. If you don’t want to wait for next year’s ice festival, you can learn to ice climb with a local guide company. There’s a list here on the Ouray Ice Park website including Chicks With Picks that teaches women to ice climb.


Five ways for beginners to survive winter running

I got the bright idea to run my first 5k right as winter was arriving in Denver. A few years later, I signed up for my first half marathon in April and realized I had to start training at the beginning of December. Needless to say, I’ve had a little experience with how to stay motivated once the temperature drops.

Well, let’s be honest, the motivation isn’t always there. But a few things that will at least make sure you have a not-miserable time.

1. A headlamp

Running in the dark is significantly less awful if you can see where you’re going. Headlamps are a LOT brighter than your cell phone light, allow you be hands-free, and help cars see you better. A headlamp is also really helpful if you’re running on a non-paved surface or if you, like me, have terrible sidewalks in your neighborhood.

There are running-specific headlamps, but I’m a big believer in using what you have, and I have a regular one for camping, so I use that.

2. Layers on layers on layers

A moisture-wicking base layer (aka the layer closest to your skin) is the most critical to staying warm. Especially if you overdress like me, once you’ve run enough to get sweaty, your back/torso can end up wet or damp. And wet in the winter means you are COLD on your run.

A shirt that is not cotton will go a long way in keeping your dry. Merino wool is the nicest option, but can be pricey. Synthetic fabrics like this REI version are your more affordable bet.

You’ll obviously have to layer on top of whatever you have as a base layer. Bundling up in multiple layers helps you manage your body temperature, but it’s a delicate balance that requires a little trial and error. Here are my best tips >>

3. Reflective gear

If you have a nine to five job, odds are you’re running in the dark on the weekdays. Make sure cars can see you by getting something that either glows in the dark or is reflective.

Combined with a headlamp, I wear a reflective vest and reflective anklets. Some would say this is overkill but Denver drivers are *pretty* bad, so I’m not taking any chances.

Anklets or wristbands can be the cheapest way to get something reflective, so consider starting there. If you want to get totally outfitted, try my affordable picks for gear.

4. Make it a habit

Crawling out of your warm bed at 6 a.m. is not the easiest thing to do when it’s dark and cold, but I’ve done the unthinkable and actually manage to do that (almost) every week.

How? I don’t do it every day. I keep that early morning runs easy. And I don’t always expect to feel motivated to do it. Read my other secrets to early morning running success.

5. A sense of humor

The running world is starting to catch on to the power of beginners (hello, we have to buy all the new stuff to get started) or at least recognize that we’re here. But most articles of “things you only get if you’re a runner” still don’t make sense to me, so I made my own just for beginners. 16 Beginner Runner Truths >>

beginner runner truths 2

Beginner’s guide to skiing Copper Mountain

The US Ski Team trains at Copper, but suffice it to say I enjoy a substantially lower caliber of skiing there. It’s a great mountain for beginners and where I learned to ski.

My initial lesson had me feeling so confident that I decided it would be a good idea to go down an entire run afterward (to the chagrin of my instructor), which resulted in me crying and walking my way down the last third of the mountain.

This taught me that not all green runs are equal. I’ve learned from my mistakes, worked my way through the easiest green runs at Copper, and finally took on my first beginner-friendly blue (tear-free!). I hope this guide helps you do the same.

Skiing 101

What do all of these colors mean??
Green is the easiest level of ski runs. Blue is considered intermediate. They aren’t always significantly steeper, but are usually significantly longer, so if you’re going to try a blue for the first time make sure you have plenty of gas in the tank.

What is the difference between a lift and a run?
A lift is the thing you ride up the mountain. A run is the route you take down it.

What should I expect for my first ski lesson?
That’s a different post. Find that here. And here’s what to wear your first time skiing. This blog covers your next step – heading out on your own after your first lesson.

Can I go skiing any time of year on the runs described here?
Unfortunately, a lot of Copper’s beginner stuff doesn’t open immediately. Typically, everything described in this blog is open by January. Find out what runs are open right now.

Okay, let’s get into it!

What part of Copper Mountain to start on

Copper has three sections – West Village, Center Village, and East Village. As a beginner, you want West Village, which is made up of beginner-friendly green runs and some easy blues for when you’re ready to do more.

Remember what I said about not all greens being equal? The end of American Flyer’s main green run (Coppertone) is incredibly steep and crowded with a lot of runs converging together. It was honestly terrifying to me as a beginner, so just don’t even mess with Center Village until you’re confident going down everything in West.

(Here’s a map for you to reference)

Start at the Kokomo Express lift, which drops you off at the bottom half of a run called Roundabout. This section of the run at times barely qualifies as downhill and is the run that all of the tiny children learn to ski on. So it’s perfect. Swallow your pride and take a few runs down that to ease into things and get comfortable.

I only ski a few times a year, so the first time I get out in the winter I’m always unsure whether I actually remember how to ski, so a quick run down Roundabout can be very reassuring.

Your next step up is getting back on Kokomo to take another lift further up the mountain: Lumberjack. I will warn you that as of January 2019 this lift’s seats were still super old and uncomfortable, but it’s worth the dead legs to get a slightly longer, but not steep run in.

From the top of Lumberjack, take the run to your right called West Ten Mile. This run is longer than Roundabout and is still one of my favorite sections. It’s got a very gentle slope, the run is super wide, and usually, there are few other skiers on it.

man in black ski gear stands in ankle-deep snow on an ungroomed ski run. on the left, there is a groomed run that looks like corduroy.
West Ten Mile with lots of fresh powder! This is what a non-groomed run looks like after a bunch of new snow. You can see the “corduroy” on the left where it has been groomed. Skiing groomed runs is much easier!

Next, take Kokomo up again but turn left and go down Prospector. This will give you a taste of a steeper hill at the end of the run without getting you in over your head. From there, you can take Kokomo to Lumberjack again. This time, turn left and go down Roundabout to Fairway and end on Prospector.

Repeat these options until you’re feeling good. For me, this was all I did my first day outside of a lesson. You may want to do this routine for multiple days. Or all season. Or years in a row. That’s totally fine!

Building confidence gradually helped me actually enjoy myself. Skiing is supposed to be fun – remember, that’s why you’re paying all this money and willingly spending time outside in below-freezing temperatures! You don’t have to be Linsday Vonn-ing your way down the mountain to have a good time or be a “real skier.”

Okay. Let’s say you’re ready for the next level. You’re ready for the Union Creek lift! This lift is fancy in that it holds four people at a time and also moves a lot faster, so basically the opposite experience of Lumberjack in both comfort and speed.

From the top of Union Creek, take Woodwinds to Minor Matter. The beginning looks very steep (at least to me), but don’t worry it will level out and you can do this!

Woodwinds is a great confidence builder – I felt like a huge badass for making it down such a big, steep hill (I know, many experienced skiers are rolling their eyes at me right now, but this blog ain’t for you!).

The best part about taking this route is you end up at the T-Rex Grill, a restaurant in the middle of the mountain. This is a great place to take a break, eat some delicious french fries, and soak up the sun (just make sure you’ve put on sunscreen!).

Once properly satiated, you can take Woodwinds Traverse to Easy Feelin’ to get back down to the lift in a beginner-friendly manner.

When you’re comfortable there, instead of heading right back down from the T-Rex area, you can take the Timberline Express lift one level higher. From the top of Timberline, head down Soliloquy to hook back up with Roundabout, which you’ve already skied and should be familiar with from before. This entire run is really fun and one of my favorites. You get a taste of a steeper start and a longer distance but are still on totally beginner-friendly runs.

There is one very steep hill on Soliloquy (in my beginner’s eyes) that you kind of bomb down to make it back up the next hill that takes you down the rest of the run. It is a little scary at first but ultimately also a good confidence builder.

From here, you have a bunch of options. You can connect back to the T-Rex area from Soliloquy, you can take different routes off Union Creek, anything you’d like. I liked Scooter and Vein Glory a lot since they were both lower traffic, not super steep, and very pretty. At this point, you’ll probably be comfortable on anything green on Union Creek, Kokomo, Lumberjack, or Timberline.

I’d like to interrupt this happy, gradual progression to say if you’re not even remotely in your comfort zone, that’s completely okay. I had done all of these runs but on our second or third time out, I was feeling borderline out of control, like I didn’t have the control over my speed that I wanted, which was making me feel really scared and nervous. Skiing wasn’t fun anymore.

At this point, I asked my husband for help. I do not take instructions well from my lovely spouse and have been known to be a bit stubborn. But something wasn’t working.

If you find yourself in this position, ask a friend, family member, or spouse for help if they have expertise. Otherwise, invest in another lesson. Don’t risk shaking your confidence long-term just because you’re stubborn like me!

Billy’s advice got me back on track, and eventually, I was ready for my first blue.

(Reminder that it’s okay if you never want to ski a blue in your life)

The shortest blues are off Timberline Express so you can see them from the T-Rex Grill. This was really helpful to me to feel like I had a good idea of what I was getting myself into. Billy had skied The Moz and said it would be a good one for me to try, so we decided to start there. (Whichever one you choose, make sure to check if it’s groomed before going down it – that will make things much easier!)

Remember what I said about blues being harder because they’re longer and steeper? I definitely felt that on The Moz. It wasn’t anything too crazy steep, but I found myself having to sit down and take a break halfway down because my legs were screaming. This alarmed the ski patrol since I think they were worried I had fallen and couldn’t get up. Just try to get off to the side of the run before you sit down – that way you won’t be in everyone else’s way!

You can take another break when you get back down T-Rex. Perhaps a celebratory beer for making it this far! Or celebratory french fries. Whatever floats your boat.

IMG_4591
My first blue, coming down The Moz. I am practically skiing uphill, but in my mind, I was really flying.

Beginner’s Trail Guide: The Byzantine Road on the Greek island of Paros

When we decided to go to Greece for our honeymoon, I didn’t think hiking would be a big part of it. But the islands have beginner-friendly trails that are a must for anyone traveling there. Besides the Caldera Path in Santorini, our other big hike was the Byzantine Road on another Greek island called Paros.

The entire trail is 2.2 miles total, taking you from the mountains of Lefkes to the beaches of Piso Livadi. Like so much of Greece, it’s incredible to be in places that are thousands of years old, no matter how much of a history buff you may or may not be. The Byzantine Road is the oldest road on Paros, dating back to 1,000 AD.

Hiking the road is beginner-friendly, incredibly beautiful, and shows you a different side of Paros you wouldn’t otherwise see. It’s mostly flat or downhill if you start in Lefkes, with just one big (but doable) hill.

You’ll walk through groves of olive trees and enjoy panoramic views of mountains, the Aegean Sea, and other villages (plus neighboring island Naxos is visible). The entire thing was originally paved with marble, so the path itself is also gorgeous.

View from the Byzantine Road in Paros, Greece, with the Greek farmland stretching out to the coastline. The mountains of Naxos are on the horizon on a beautiful clear day.
Views of Naxos, the larger island to the east, and the coast of Paros.
Scrubby mountains with the white buildings of Lefkes visible in a small valley. A mountain peak is on the horizon with several radio towers poking out into the clear blue sky.
Looking back at Lefkes.

Taking the bus from Naoussa (where we stayed) to Lefkes was very easy, and I would highly recommend the bus system no matter what island you stay on. It’s cheap, quick, and significantly lower stress than trying to drive yourself around.

We arrived in Lefkes on the first bus (not actually that early since Greek “early” is nowhere near American early!) to try to beat the heat. Most of the trail is in the sun, so we really didn’t want to be out there during the afternoon.

Lefkes is not that big, so it’s difficult to lose your way. The bus drops you off on the outskirts of town, but you just follow the main road. There are no cars allowed in Lefkes which was SO nice after fearing for our lives walking along the roads in Naoussa.

Once you get into the main part of town you’ll see a bakery and the first of several signs pointing you toward the Byzantine Road. We stocked up on water at the bakery in town before heading down to the trail.

Stopping at the bakery was a major exercise in self-control, but I reminded myself that hiking on a hot day with a stomach full of eclairs probably wasn’t a great idea. (There are no trailhead port-o-potties in Greece!)

We honestly could have easily burned half a day just exploring Lefkes – even the walk down to where the Byzantine Road started was really scenic. There are so many cafes and other places to explore (and photograph) that it took us a while just to get out of town.

stone paved stairs lead down into the town of Lefkes. A yellow building on the left has a wooden sign for the Byzantine Path. White buildings and bright pink bougainvillea are straight ahead.

The trail itself is just a few miles, but with all of our photo stops it took us a several hours. My self-control was limited only to inhaling pastries and I took a million photos (including about a dozen blurry olive tree photos if you’re wondering about the quality of my photography). But you’re on vacation in Greece, why would you rush?!

Walking from Lefkes, you’re going downhill almost the entire way. This was actually more difficult than I banked on since my knees started yelling at me for all that descending. We just took our time and stopped as often as we needed to.

This actually made going uphill a welcome change. It was definitely the first time in my life I found myself thinking, “Oh thank GOD we’re going uphill now!” The path does level out several times, which is obviously ideal, but there’s one last big hill before you begin the final descent into Prodromos.

Once we got to Prodromos we immediately threw our original plans out the window. We thought we would just turn around for the return trip to Lefkes, since we didn’t really want to go all the way to Piso Livadi. But we quickly realized walking back meant walking completely uphill in the sun at 1:00 in the afternoon. And our stomachs were growling. No thank you!

A stone paved path leads through all-white archways, with lush green plants, hot pink bougainvillea, and blue spiral staircases leading up to homes.
Prodromos did not seem like a bad place to explore.

Instead, we decided to explore Prodromos and take the bus back to Naoussa, where we were staying. There’s a marginally helpful map when you first get to the edge of town, but we ended up just wandering around all the different alleys until we found a cafe to get a fizzy lemonade and enjoy some shade.

Since we weren’t walking back to Lefkes, we wandered around until we stumbled upon the bus stop…and discovered we missed the bus by just a few minutes. And the next one wasn’t coming for an hour and a half. Remember what I said about the bus being great? We loved it, but it have less flexibility than if you have a rental car.

By this time, we were getting hungry and had kind of exhausted all of our options for entertaining ourselves in Prodromos.

Despite no one in Prodromos speaking English, we managed to convey to the cafe owner that we needed a taxi. Stranded Americans needed a taxi didn’t seem to actually be that unusual because after a few times of me repeating, “Taxi?” with a pleading smile, the cafe owner whipped out a giant binder of people to call.

If you are interested in getting lunch in Prodromos, there are several restaurants that are actually right across from the bus stop. If you time it right, you could potentially eat at one of them and catch the bus back to Naoussa or Parikia.

Hiking the Byzantine Road was one of the highlights of our honeymoon, and I would highly recommend it to anyone looking to get off the beaten path while staying in Paros. Public transportation and taxis are both readily accessible, the path is beautiful and easy to navigate, and you’ll get a slice of Paros history that you would otherwise miss if you only hit the beaches.

a rocky path carves its way through the Greek country side. A stacked rock wall a few feet high follows the path which is framed by dark green shrubs and looks out across farmland dotted with white buildings