How to deal with your running injury

I’ve been dealing with tendonitis for four months, but admittedly haven’t been a very good patient for most of that time. Since January, I have buckled down, put on a boot, and took a break from any and all potentially cardiovascular exercise. This means no hiking, no running, no horseback riding, NOTHING.

Staying positive hasn’t been easy, but I’ve kept myself from going crazy thanks to a few things:

Working with my physical therapist on a recovery plan. Planning out a regiment for getting back in shape gives me something to look forward to, and my therapist’s never-ending optimism that I’ll be healthy in no time has been a huge help.

Finding out what I can do. Strength training and basic yoga were both on that list, so I’ve focused on getting stronger and more flexible. This will not only (hopefully) decrease the chance that I will re-injure myself, but also has kept me from going stir-crazy.

Staying involved in my normal activities as much as possible. I continued to walk to work in the boot because I would have lost it if I had to go from sitting in my car to sitting in an office all day. I couldn’t ride, but I went to the barn anyways and petted some horses and tried to absorb knowledge from others’ lessons. I couldn’t walk dogs at the shelter, but I could play with the cats and give them some loving.

I’ve relied heavily on Yoga With Adriene. It’s free and caters to all levels. Adriene is super down to earth and has some great beginner videos. I do Gentle Morning Practice during the week and spice it up with Energizing Morning Practice over the weekends. Both are excellent and will help you feel more limber and ultimately more relaxed.

But every day won’t be perfect. I’m admittedly struggling today since I’m stuck on the couch and it’s 70 and sunny. I want to go play with dogs at the animal shelter or go hiking or running or ANYTHING on this absolutely gorgeous day, but it’s a rest day for me and I’m feeling a little sore (another negativity I’m trying to push out of my mind). Plus, walking rambunctious shelter dogs in a boot (I still have to wear it for part of the day) is not recommended by my doctor.

The view from the other direction on the couch.

I know that this is all far from expert advice, but it’s what is keeping me sane on this gorgeous day that I’m stuck inside. I won’t let the boot totally keep me down today, though – you better believe I’m still going to hobble up to the park!

Fitting in when you’re a beginner in Colorado

An article in 5280 (magazine in Denver) caught my eye last week. Unfit: Being Overweight in America’s Slimmest State chronicled Rebecca Palcso’s struggle with being very unathletic in the sporty paradise that is Colorado.

She moved to Colorado in an effort to motivate herself into being fit, which you may assume went like this: I moved to Colorado, all the healthy people made me want to be healthy, now I’m running an ultramarathon! Spoiler alert: it didn’t.

Instead, Rebecca fought the insecurity and isolation that often comes with being a beginner in the midst of so many masters. You show up at a fun run in Denver, and a professional athlete (or two, or three..) is warming up at the start line.

Committing yourself to getting fit is a difficult endeavor no matter where you live (and no matter what your goals are), and I had aspirations similar to Rebecca when I moved to Colorado. A healthy dose of good genes and sporadic attempts to get in shape have kept weight off my small frame, but my cardiovascular ability left a lot to be desired.

When I first started out, I was blissfully unaware of the significantly more fit people around me. Even though I routinely stopped 20 yards into a hike because I couldn’t breathe, for some reason I didn’t notice the exceptionally gifted athletes breezing past me. It was probably the lack of oxygen.

Eventually, I began to notice how out of place I was. I joined a running club and was immediately left in the dust even by the slow group. I trudged up trails as others ran or power walked by me. Any groups of outdoorsy women I joined were (and still are) WAY over my head. I’m not one to be negative, but let’s be real…that SUCKS.

When you live in a place where everyone is incredibly fit, it can feel very isolating. I am very fortunate to have a boyfriend that is willing to jog at a snail’s pace and take as many water breaks on the mountain as I need. I have that and I still felt isolated.

Billy constantly reminded me that what I was doing was good enough, even as self-doubt ate away at me. He has been a cheerleader for running, hiking, and whatever athletic endeavor I want to try, and if I could still feel alone while having that incredible resource, then how many other people out there must be feeling even more overwhelmed by the athleticism that surrounds you as a beginner?

I don’t think this blog is the end all be all answer for beginners. It’s far from it. I’m still a beginner too, and as the weeks stretched on with me neglecting the blog, I started having second thoughts about starting again. Why bother? All of my page views come from Russia anyways (but actually, this has really happened since I haven’t been posting). Then I read Rebecca’s article.

I remembered that I started this blog to help other beginners not feel alone or discouraged or overwhelmed. Wherever you live, it’s frustratingly difficult to find other people that consider an 11-minute mile a personal record, or someone that just wants to take an easy hike for a few miles. The outdoors community is a wonderful one, but it’s hard to feel at ease when you first start out. So even if you don’t take any of my advice, if this blog is just a place for you to find someone else who is also just starting out, I hope you feel a little less out of place.

Happy New Year! You’ve got this.

Beginner’s Trail Guide: Rattlesnake Gulch in Eldorado Canyon State Park

Eldorado Canyon State Park was is less than an hour from Denver and offers stunning canyon views, an overlook at the Continental Divide, and well-maintained trails that are beginner-friendly. Rattlesnake Gulch is challenging because it’s all uphill on the way out, but as long as you take plenty of breaks along the way, you’ll be fine!

How do I get there?

The drive is super easy, except for the fact that the last mile of road isn’t paved. But, you don’t need four-wheel drive either. The road is dirt, but very packed down. There was a Camry parked next to us that presumably survived the drive up and back.

73d29-el2bdorado2bcanyon2bstate2bpark2bdirections

There’s only one road into the park, so it’s impossible to take a wrong turn.

Where do I go?

The first parking area is where the bathrooms are, but if you’re hiking Rattlesnake Gulch I recommend driving a little further in so you don’t have to walk along the road for as long. The road is narrow, so this can be a little bit nerve-wracking and I try to minimize how long I’m on the road for. As a driver, keep an eye out for pedestrians and mountain bikers!

The visitors center is past the Rattlesnake Gulch trailhead, so if you want to try out a different trail, head there first. Fowler Trail and the beginning of the Eldorado Canyon Trail are great, flatter options. You’ll get a map at the park entrance, so you don’t have to stop at the visitors center if you don’t want to.

What is the trail like?

The trail zig zags up the canyon until you reach a stunning overlook at the Continental Divide. This means great views, but you’ve got to work for them. You’re going to be going uphill for most of the time on the way out. There are plenty of places to stop and admire the view, so as long as you bring plenty of water, it’s a great hike!

fccc9-img_4681

It got my heart pumping and I was huffing and puffing a few times, but making stops for photo ops and water kept me from feeling overwhelmed.

Plus, the views are SO worth it. The trail eventually spits you out at an overlook that gives you panoramic views of the Continental Divide, the entire canyon you just climbed up (you badass you!), and the Eastern Plains.

The trail is pretty well maintained, but does get rocky in some places. If it has snowed recently, the trailhead and the parking lot will both be pretty muddy, so make sure you wear shoes you’re okay with getting dirty!

Don’t worry, I know him! Eldorado in the fall is my favorite time to visit.

If you do the entire loop at the end of the trail (see map below), it’s just under four miles. If you turn around at the Crags Hotel Ruin, you’ll hike for just over one mile, but it will take you a few hours still since it’s so uphill on the way out. The hotel ruins are also kind of meh, so I recommend continuing on to the Continental Divide Overlook before turning around.

91983-el2bdorado2bcanyon2bstate2bpark2brattlesnake2bgulch2btrail2bmap
The Continental Divide Overlook in November during a year that we hadn’t gotten much snow yet. In 2019, we’ve already had three snowstorms in October so it may look different!

What should I wear and bring?

Make sure to pack plenty of snacks, water, and anything else you think may need on your day trip because the town of Eldorado Springs doesn’t offer much. And by that I mean there’s some sort of springs “resort,” a post office, an odd sculpture garden…and that’s it. No gas station, so be prepared!

Like I said, where shoes you don’t mind getting dirty. I’ve hiked in trail running sneakers and hiking boots, both of which were fine. Just make sure to wear something grippy because there are rocky, more technical parts of the trail. You can also bring hiking poles if you have them (or rent them from REI) to help you get up the hills more easily.

Make sure to dress in layers, too, because the shady parts of the canyon are quite cool! Here’s my guide to what to wear hiking >>

Is it crowded?

This is a very popular route, but it’s hiker-only which is nice. You certainly won’t be by yourself since you’re within an hour of Denver and this is a well-known hiking area. But, that just means you have plenty of people to take your photo!

Anything else I should know?

There is an entry fee of $9 per car since it’s a state park. If you plan on visiting multiple times or exploring several of Colorado’s beautiful state parks, I would look into getting an annual pass. It’s $80 per year, which gets you into every state park as often as you would like. The super nice woman at the park entrance suggested getting the pass on the first of the month — you get 13 months out of your pass that way!

Other Resources

Park Map
Colorado Parks & Wildlife Park Pass and other fee information
What snacks should I pack?
How do I stay hydrated on the trail?
What do I wear hiking?
How do I pick out good hiking boots?

Gear Guide: The best reservoir to carry your water on the trail

Your first and most obvious option for hydration is a water bottle, but a reservoir lets you go hands-free and bring a lot more water with you, which is important if you’re going to be out on the trail for several hours.

You do have to have a backpack to take advantage of the wonderful world of bladders (add that to the list of things I thought I’d never say). The first and most obvious step to bladder shopping is making sure you’re buying the right size. For a basic backpack, 1.5 liters will be plenty. When in doubt, consult a store employee.

As I was shopping, an REI employee informed me that all the brands of reservoirs are really about the same. While I would eventually find out that this is not true at all, at the moment I simply went with the cheapest one – the Osprey Hydraulics LT Reservoir.

429ce-how2bto2bstay2bhydrated2bwhile2bhiking2b1

The Osprey had a handy dandy lip on the opening of the reservoir that you can hold while awkwardly trying to fill up at your kitchen sink. I also really liked the mouthpiece (the part you suck water out of), which came with a magnet to keep it attached to your backpack strap for easy access.

The issue I had with the Osprey reservoir is a BIG one – it leaked all 1.5 liters of water into my backpack right before we left to go hiking. Twice. Since REI has an awesome return policy, I exchanged the reservoir for a new one thinking it was just a bad egg. Then the second one did the exact same thing, and I decided to try a new brand.

My next stop (because it was only marginally more expensive) was the Camelbak Antidote 50 fluid ounce (or 1.5 liters) reservoir. Honestly, I didn’t like this one immediately out of the box. Despite claiming it holds 1.5 liters of water, it was way smaller than my previous reservoir. To be sure, I emptied my .75 liter water bottle into it and promptly filled the reservoir almost all the way up. To make matters worse, it immediately leaked all of that water into my backpack (are you seeing a theme?).

How are you going to tell me that this holds the same amount of water as the first one?

Perhaps I’m just cursed with bad bladder luck. My boyfriend has an Osprey that he loves and never has issues with, and I do love my Camelbak water bottle because it never leaks.

Nevertheless, I was beginning to get a bit frustrated. I dutifully went back to REI to return the Camelbak (a great reason to shop at REI…they let you return anything within a year, even if you can’t figure out how to stuff it back into the overly complicated packaging). Platypus was the first brand in the aisle, so I made the highly analytical choice to grab that one since it was closest.

On my way to the cash register, an REI employee informed me that his friend accidentally ran over his Platypus bladder (the brand name just works too well with the word bladder) with a truck and it had yet to leak. Promising!

32b19-how2bto2bstay2bhydrated2bwhile2bhiking2b3

At home, I filled up the Platypus Big Zip LP and put it in a big bowl overnight to see what would happen. The reservoir passed that test, so I put it in my backpack along with some clothes and snacks to simulate what I usually stuff in there. There was no backpack leakage when I came home from work, and in the 10 months that have passed since this was originally posted, I’ve never had a leakage issue. I have officially proclaimed it the winner.

One last note – I don’t love the Big Zip interface, but I can live with it since all I really care about is that the thing doesn’t leak. That blue piece of plastic slides off, and then you open the top like a Ziploc bag, which makes it a little difficult to fill up since there isn’t a plastic rim to hold on to like the Osprey model. You get used to it, but it’s not as ideal as Osprey’s set up.

However, a nice feature of this reservoir is that there is a piece of plastic on the inside that connects the front and the back. This keeps it from ballooning out once you’ve filled it up and instead makes it stay nice and flat in your pack. This is especially helpful to me since I like to push my backpack to its limits by stuffing as many items in it as possible.

bring all the stufff

REI’s Snowshoeing Basics class is worth your time

Growing up on the East Coast, winter was something to dread. Once it arrived, you wrapped yourself in blankets and just waited for it to be over. In Colorado, it’s different. Winter is something to get excited for. Snowshoeing was my gateway drug.

Step one of my foray into snowshoeing was REI’s Snowshoeing Basics class. It was free and a huge help in knowing where to start. I learned how to dress, how to put on snowshoes, and how to pick out what to rent. It was a huge confidence boost, and I highly recommend it for any fellow beginner. Worst case scenario, you get a 20% off coupon to use at REI and you find out you don’t want to try snowshoeing.

Check out all of REI’s current class listings here.

Since originally writing this post, it’s become a mash-up of the REI class plus my own experience as a first-time snowshoer.

Renting vs. Buying

Renting is cheaper, plus you don’t want to blow a few hundred bucks on something you may never actually want to do again.

Renting from REI is $24 per day for members (you just have to give them you’re phone number, it’s not a skill-based membership). BUT that’s way more expensive than smaller, local shops.

The only difference is the extra day REI gives you to return your snow shoes, but it’s not hard to just bring them back and pick them up all in one day since you’ll only be going out for an hour or two.

Estes Park Mountain Shop, which is at Rocky Mountain National Park’s doorstep, is only $5 a day – a steal compared to REI. Jax is a great option for the Fort Collins area and Bent Gate Mountaineering is conveniently located in Golden. Adult snowshoes are $12 a day at both places.

If you don’t live in the Denver area, I would highly suggest doing some research on local rental companies before wasting money at REI (which is not a phrase I say often).

Sizing and Fit

You want the smallest pair that is appropriate for your activity level and size. The rental place should be able to make this judgment call for you, similar to when you rent skis or any other equipment.

Make sure your boots fit through the hole in the deck of the snowshoe. The deck is the big bottom part – like the deck of a skateboard.

Types of Snowshoes

Who knew there were even more than one type of snowshoes? Not this girl. Most rental places may only have one type, but this is still good information to have just in case.

Aluminum vs. Composite. Composite (aka plastic) snowshoes are durable, less expensive, and can be repaired out on the trail, so give them a try. The composite ones we rented from Bent Gate Mountaineering in Golden were great! Light on your feet, easy to use, and, fortunately, we didn’t have to to test out the repair process.

Tension Pivot vs. Free Pivot. This refers to the type of pivot point on the snowshoe, which is where you stick your foot. Tension pivots are great for fitness/ambitious peeps since they are more maneuverable. There is a negligible difference of energy expended in either type – it comes down to personal preference (pretty much the theme of 99% of outdoorsy things). As far as I know, the ones we had were free pivot, and they were fine.

Accessories

Poles. These will make your life SO much easier. I forgot to get poles on our first trip and deeply regretted it. You can use regular hiking poles, just get snow baskets for them. If you have poles, they’ll be useless without snow baskets.

If you’re wondering what the hell trekking poles are, they are the sticks you probably have judged people for hiking with because they look ultra-nerdy. Banish that thought from your mind. Poles are your best friend for hilly terrain. Try them once (or twice…they were awkward at first for me) and you will never go back.

Basic Skills

REI did a great overview of basic mechanics and skills – it was a good primer for their field class or simply trying it on your own.

The best way to learn to snowshoe seems to be to just get out there and do it. It didn’t seem like rocket science to me, so my husband and I tried it on our on at a trail close to home. If you would rather go with a group, take a look at REI’s day trips.

The most confusing part about snowshoeing turned out to be putting them on. Ours weren’t marked left and right, so we put them on so that the extra part of the straps were on the outside of our feet. This keeps you from stepping on them and tripping.

Once you’ve decided which shoes go on which feet, make sure your toe is far enough back from the front of the snowshoe that it won’t get stuck as you walk. There’s a big hole for your foot, so it’s pretty easy to figure out.

Widen the straps so you can slide your foot in, then tighten the straps starting with the toe strap (aka the one over your toe). Do the heel strap next, and the instep is the last one you adjust. Make sure they’re secure to your feet without cutting off your circulation. It’s easy to adjust on the trail, which I did several times before I found the sweet spot.

What to Bring

It’s always a good policy to be prepared for anything when you’re on the trail, but this is especially important in the winter. A sunny winter day can turn into a whiteout blizzard. That’s rare, but, it’s better to be safe than sorry. Here’s what I had in my backpack:

  • LOTS of snacks. Multiple Probars and a huge bag of trail mix.
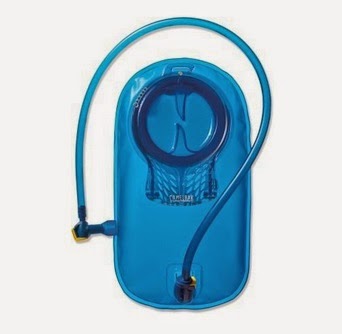
  • A 1.5-liter reservoir of water. You can also just bring multiple water bottles. If you do use a reservoir, make sure to blow the water back into it after you drink – if it sits in the tube, it freezes.
  • First aid kit, including an emergency space blanket.
  • Headlamp for emergencies.
  • Extra layers, toe warmers, and hand warmers. Great tip from Matt at REI – Put hand warmers on the insides of your wrists or the back of your hands for maximum effectiveness.
  • Sunblock. Schmear it all over unexpected places. The bottom of your nose, under your jawline, under your ears. Snow gives you a sunburn in places you wouldn’t think possible, a lesson I have unfortunately learned firsthand.
  • Chapstick
  • Ski goggles/sunglasses. Whichever one you have, bring them.

Other Random Hints

  • Waterproof shoes are an absolute must.
  • The “umbles” are a sign of hypothermia – stumbles, mumbles, and fumbles. Keep an eye on your buddy and make sure they put on an extra layer or drink something warm if they start exhibiting any signs of hypothermia.
  • The first signs of frostbite are waxy/white skin on extremities.
  • Use lithium batteries for anything battery-operated. Other batteries tend to freeze.

The next step after attending the Snowshoeing Basics class is hitting the trail. So strap on a pair of snowshoes and get going! If you want a bit more guidance, the National Park Service offers free guided snowshoeing programs at Rocky Mountain National Park throughout the winter.

Note: In case you were curious, I received absolutely no compensation from REI for this post. The class was free to begin with, and I wanted to find out more about snowshoeing. I’m happy to share the information with my fellow OBs 🙂

Other Resources: